To the average home gardener mediocre seed starting results are a source of delight. They did it! Coaxed life out of seeds in a windowsill using recycled containers, egg shells, toilet paper tubes … whatever will hold soil and water that cost nothing. Been there. Done that… well, except for the egg shells and toilet paper tubes. I want roots. As many as possible, a clump as big and thick as you can get it in the confinements of a cell-pak tray. And I want it to be developed by or before the plants can survive outdoors after danger of frost passes. Sorry, but this ain’t happenin’ in no egg shell or toilet paper tube. Nor is it going to be the result of expanding Jiffy pucks and peat pots… been there too.
I’m after ripe tomatoes before that early frost threatens. The goal is plants that bear fruit in record time. Going about it the average way means your plants will spend most of the growing season trying to build themselves into a productive state. The focus should be: as below, so above – not the other way around. Unless you live in a frost free zone like Southern California or Florida where if it takes till Christmas it’s no big deal. I have an average of 16 weeks – sometimes it’s less, sometimes it’s more, but frost WILL touch down before Halloween.
I thought I found perfection last year, but had non-stop deficiency issues that started in the seed trays. I suspect that something in Wonder Soil combined with my hard water caused an inability for enough potassium to be available for uptake. So this year I tried Oasis Horticubes to germinate seeds, transplanting to 6-pack cells with Ocean Forest 2 weeks after seeds popped. Lots of them already had roots trailing in the water.
Excellent Germination Rates!
The biggest problem most people have during germination is a lack of oxygen because the media used is too wet or drains poorly, or they aren’t using bottom watering through capillary action that leads to inconsistent moisture. Horticubes rule out all of these issues as long as you make sure the tray doesn’t run dry. You don’t need a wicking mat, but faster germination is found with a humidity dome than without. Some of my tomatoes are rather leggy, because they sprouted before I expected any action, and under the darkness of a towel over the dome were doing some serious sun hunting… on Day 5. (Note to self: Check seeds for action starting on Day 3.)
Even the maddeningly slow-to-sprout peppers were popping by Day 5, and had to deal with only south window sunshine for a week while I finished a painting project to make room for the grow rack. Thankfully it wasn’t cloudy like it usually is! With the mess out of the way these were quickly under an 8-tube HO T5 light from 7 am to 11 pm.
If the tomatoes look meager in comparison, it’s because they were started 3 weeks later. I will find the solution to having bigger pepper plants at planting time yet. And tomatoes that aren’t too tall for the highest light position. In a perfect world they would spend their last month indoors inside a greenhouse luxuriating in 4″ pots… but it’s a bit short of Utopia here. (High wind and heavy snow-load greenhouse coverage available. Donations accepted 😉 )
How It Works
They come in large sheets of pre-drilled cubes that are easily snapped apart into sections or even single units. The holes are deep enough for large seed, so when planting things like herbs, tomatoes, and stuff with finer seed it’s best to make it shallower. First saturate the section or sheet you’ve going to use so your seed doesn’t end up too deep. Then fill the hole part way with perlite if you need too, add the seeds followed by a light covering over top. You can also use small pieces of the Oasis foam from the corner of a block if you want the seed deeper but covered, like the ones on the right side of the photo below.
The sponge-like consistency of Oasis Horticubes readily wick up water, providing consistent moisture from top to bottom. The porous material allows good air flow and makes oxygen readily available to the seed and seedlings in perfect proportions, much like fiber pots or clay pots do for container-grown plants. They are designed for both forms of starting plants, and should be just as good for rooting cuttings. Haven’t tried this yet, but give me some cuttings worth rooting and I will. Summer is coming.
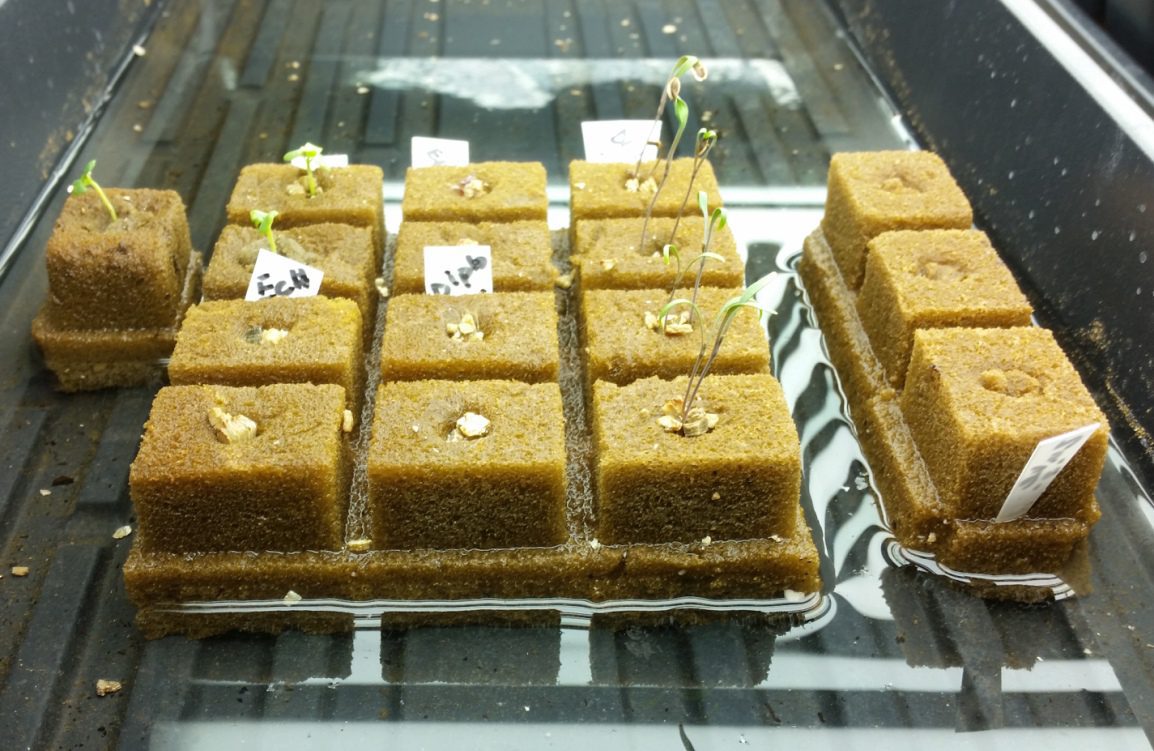
Under lights and without the humidity dome, evaporation of water in the tray is rather fast. You have to replenish the water once a day when your seedlings are tiny, and then twice a day once they start putting out roots and getting bigger. At first I was putting in about 1/4″ of water with concern about making them too wet. But finding the tray almost bone dry a few hours later, I upped it to 1/2″ of water to guard against them drying out on me too rapidly. No adverse reactions were observed, so this gives you peace of mind if you work away from home or want to go out for the day. You’ve got about 8 hours until it’s a must to refresh the water supply. This is just one more reason to transplant into potting mix by the two week mark, the other being the seedlings now need nutrients.
There are 3 sizes to pick from. I chose the medium 1 1/4″ option, because the smallest seemed way too tiny. Next time I will buy both tiny and mid-size, and use the smallest for seeds and the bigger one for cuttings. Even on a budget, Horticubes are affordable, and a 2-sheet package will last you several seasons at a cost of under a penny apiece, or less, if you go for the 1″ thins that give you over double the cubes for the same price. The box was only $18 – cheaper than seed starting mix, and much more efficient. A very fair exchange for almost 100% germination rate, and super fast sprouting action too.
Best Seed Starting Results
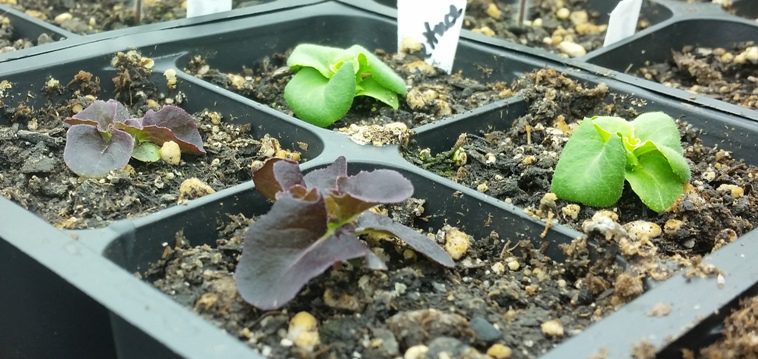
All my peppers sprouted readily, with the Habeneros taking their sweet time as usual. So far all the herbs sown are up, but the perennials I’m testing might not like the heat, so I’m moving them to a clamshell tray in a window where it’s a bit cooler to see if it helps. Only 1 tomato variety didn’t sprout on the first seeding, but finally I have signs of life in those after resowing. If you decide to grow Backa, it is perhaps a variety with a lower germination rate, so drop 3-4 seeds in a cell. It’s a cinch to pull the extras and move them to their own cube. Far easier than doing so with potting soil since the young roots are in chunky perlite. Not one yanked out extra failed to make it as a transplant.