Full disclosure: I don’t mind reeking of garlic. I cook with it daily and love it for its flavor and many health benefits. That’s why I’m willing to devote part of my garden to this delicious crop. Plus, garlic is super easy to grow!
The Benefits
Garlic is part of the Allium family and is a close relative of onions, leeks, and shallots.
When eaten raw, garlic is highly antimicrobial. It helps boost the immune system and protect against colds and flu; it improves bone health, cholesterol levels, and blood pressure; and can even prevent dementia and Alzheimer’s disease.
Did I mention it tastes delicious?
Varieties
Before planting garlic, it’s essential to know which varieties will perform well in your specific climate.
For gardeners living in Canada and the Northern United States, hardneck varieties are best. They are very hardy and can stand up to the coldest temperatures.
If you live in a warmer climate, softneck garlic will do.
There are hundreds of options; before purchasing garlic sets for planting, be sure to check with your garden center to see if the variety performs well in your climate.
When To Plant Garlic
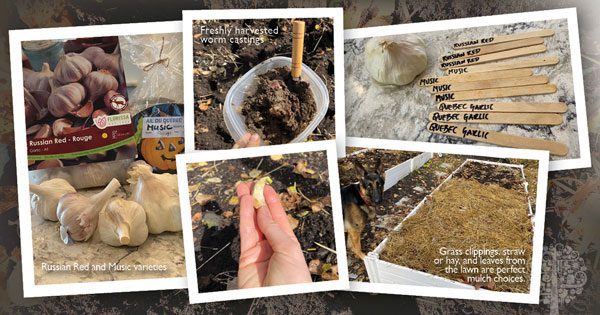
Living in zone 3, I am growing the Russian Red and Music varieties.
My garden center recommends waiting until around Halloween to plant hardneck garlic, but a little online research will show you it can be done anytime after the first fall frost.
Don’t put the garlic cloves into the ground too early! It’s common for the weather to warm up after a frost, and you don’t want the garlic to sprout before the snow flies.
The cloves need to winter underground to root and produce big bulbs before harvest in the summer.
How To Plant Garlic
Garlic loves sun, so choose a bright location in the garden for this crop.
About a month before planting, I applied a three-inch layer of compost to my garden beds. Garlic is a heavy-feeding plant and loves fertile soil.
Gently separate your garlic cloves. Try not to remove too much of the white paper on the outside of the clove.
Make holes 3-4 inches deep and 5-6 inches apart. Plant one clove per hole pointed side up.
At this point, I added some freshly harvested worm castings to the garden bed for good measure. You can also water lightly, so the soil is just moist.
After, I covered the holes with soil and added a three-inch layer of mulch to protect the cloves from the extreme cold. Grass clippings, straw or hay, and leaves from the lawn are perfect mulch choices. I used a combination of all three; German shepherd approved!
If you get a lot of wind, cover the mulch layer with a piece of landscape fabric or chicken wire to keep it from blowing away.
Walk Away
That’s all you have to do for now. The cloves will begin to root and resume growing into new bulbs come the spring! Once the snow melts, be sure to start watering again, but never drench the soil.
If you’ve planted in the fall, you should be ready to harvest garlic come July!
your banner photo show a shrivelled-looking bulb that looks like some cloves I had left from last year. Is that what it is? I was about to experiment and plant some…Is that what it is? Or what is it?
Thanks. (zone 3 – well barely)