About this time of year, gardeners have entered the tomato tsunami season. You’ve eaten them every day in every way imaginable, but they just keep coming. Before you start giving away the fruit of your labor, consider preserving your harvest and enjoy it for months to come, even on a cold winter day!
Preserve ALL Those Tomatoes
Even the cracked and spotted ones. You might be surprised at the number of ways to save all the tomatoes your garden produces.
There are two options for preserving tomatoes: canning and freezing.
Cracked and punctured tomatoes are not good for canning. If the skin has been ruptured, the presence of bacteria could exist in your fruit before you get it into the jar. High-temperature cooking kills many forms of bacteria, and boiling for 10 minutes or more is high temperature. You have to know what is a possible problem and what is not, and if you don’t, it’s best to exercise extreme caution.
Preserving Damaged Tomatoes
These need to be frozen, and it’s the fastest, easiest way to stock up on tomatoes. You can freeze them whole, but they take up too much space, and frost will set in rapidly.
It’s best to wash them, remove the cores and cut out all the bad spots with enough extra flesh around the wound to be sure you’ve got no deteriorating spots left. Don’t bother removing the skins, though you might want to get rid of the seeds and the excess watery juice in their pouches. If you’ll use them for soup they’re fine as is.
Run them through your food processor to chop them up. Unless you left them in large chunks, the skins are not noticeable in finished dishes, and if you do, the skins are easily removed once you start cooking them.
Once chopped to your liking, fill freezer storage bags that best fit your future recipe requirements. Remove as much of the air in the bag as possible. Very little frost can form in there even after a year!
You can freeze them raw or cook them down by about 1/3 as you would before making soup, chili, or spaghetti sauce.
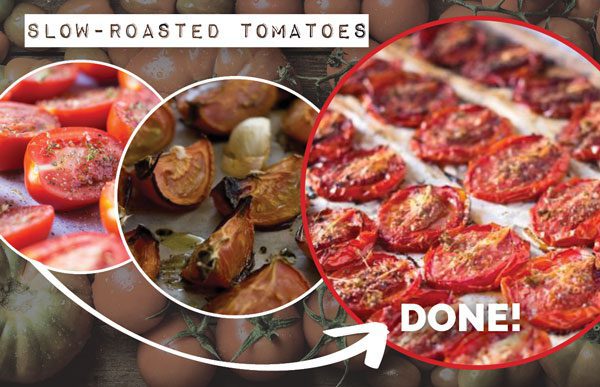
Slow-Roasted Tomatoes
Those sun-dried things you buy at the store don’t hold a candle to these. There’s an entire summer packed into every bite. It’s hard not to devour them right out of the oven.
Pack these as described above.
Slow-roasted tomatoes take a long time to bake, but the oven is set really low at 225℉. Depending on the size of the chunks, it will take about 6-8 hours. The low heat and salt remove most of the moisture, leaving only rich, condensed, tomatoey goodness behind.
These tomatoes are great with meats, on toast or baguettes with goat’s cheese or cream cheese, on a pizza, and in pasta dishes with buttery or creamy sauces. You can use them whole or pureed.
What You Need
- Parchment paper
- Kosher or Sea Salt
- Olive oil
- Garlic cloves – about 8 per tray
- Herbs (oregano, thyme, basil, rosemary, Italian seasoning blend)
Directions
- Preheat the oven to 225°F.
- Cut the cleaned, cored tomatoes into pieces lengthwise – from stem to blossom end. If using cherry tomatoes, cut in half. Small tomatoes, cut into thirds. Medium tomatoes, cut into quarters or more. Large tomatoes, cut into 6 or 8 wedges.
- Put the tomato sections into a large bowl. Drizzle olive oil over the top. Stir gently to coat as best as possible.
- Line the baking sheet with parchment paper.
- Sprinkle salt on the paper and lay your pieces on top. Too much salt won’t be good!
- Fill the tray in a single layer. Add your garlic cloves here and there. Sprinkle your chosen herbs over the top, again – don’t overdo it.
- Put the trays into the oven and set the timer for 2 hours for small tomatoes – 3 hours for larger tomato sections. The skins should easily peel off with a fork when the time goes off. Flip them over after removing the skins. If you’re doing cherry tomatoes or using them for appetizers, you might want to leave the skin intact.
- Return the trays to the oven – but switch their rack location. The pan on the bottom rack will be cooking faster than the one above it. Reset your timer for 1 hour. Switch the tray’s racks again, and return them to the oven for another hour. By this point, cherry tomatoes and small tomato’s wedges or slices will probably be done. All the watery juice in the pan will have evaporated. Larger tomato pieces will have to bake longer – just keep switching their spot in the oven so you have them all done about the same time.
- Let them cool before bagging them for the freezer or refrigerator. You don’t want steam putting water back into their container.
- You can discard the garlic, use it in whatever dish you’re making, or save them to use in something else.
Notes
Once you’ve done this a couple of times you’ll have a feel for how long to bake different thicknesses and sizes of tomatoes. The smaller they are, the faster they dehydrate. The salt helps to draw out the water content much faster than without it.
It’s okay if they get a little brown around the edges – it actually makes them even better tasting.
A lot of people don’t remove the skins. With a cherry tomato doing so would be pointless, but the skins are tough, and with larger tomatoes, there’s enough meat that the skin isn’t necessary. The longer you delay in removing the skins – the more time it will take for the water to leave the tomato meat. The same can be said about turning them over – if you don’t, it means more time in the oven or improperly roasted tomatoes.
How do you know they are done? The tomatoes in the first image below (left) are not done: the tomatoes are still juicy (Courtesy of Veggies On The Counter). The second image shows properly finished roasted tomatoes – reduced to moist, not juicy fruit-meats. (Courtesy of The Cook’s Pyjamas). If packaged and frozen correctly, the tomatoes – even after defrosting – will not be reduced to slop.
Enjoy your harvest for months to come!