
Root-Zone as Joystick: Irrigation & EC Tools for Steering (Part 2)
The North Star Metric: Revenue Per Square Foot Per Day
In Part 1, we explored water potential, the science explaining why plants respond to environmental manipulation. Now let’s connect that theory to root-zone, and what matters most in commercial cultivation: profitability.

The only metric that truly matters is revenue dollars per square foot of canopy per day ($/ft²/day). Not yield alone. Not grams per watt. This metric captures the complete picture: how much money your facility generates from each square foot over time.
This metric comprises three components: yield in grams per square foot, cycle time in days, and quality, reflected in the price per gram. Crop steering lets you optimise all three. Shaving a week off cycle time increases annual capacity by 10-15%. Improving structure to pack more flower sites per square foot directly increases yield. Enhancing secondary metabolite production can improve quality grades by 20-40% in price per gram. Each improvement compounds to drive $/ft²/day upward.
Learn more about the $/ft2/day metric at frontrowag.com/kpi
The Intermediate Goals: What Crop Steering Actually Achieves
For the purposes of increasing $/ft2/day, crop steering pursues specific, measurable outcomes at each growth phase:
Vegetative phase: Rapid structure establishment with optimal nodal spacing and vigorous roots. Timeline target: Reach flip-ready size within the minimum number of days. Every week saved is 5-7% more annual capacity.
Early flower: Earlier initiation (save 3-7 days), maximum flower sites per ft², dense node spacing, minimal stretch. These outcomes set the stage for everything that follows.
Mid-flower: Rapid cellular expansion and maintained turgor. Build bulk fast. Time saved here compounds capacity gains.
Late flower: Secondary metabolite production (cannabinoids, terpenes), controlled finish, no late vegetative reversion.
Every goal is achieved by manipulating water potential through root-zone controls. That’s your joystick.

The Control System: Three Phases, Five Example Dials
Think of each 24-hour cycle as three distinct phases with five practical irrigation controls you adjust to create specific water stress patterns.
The Three Daily Phases
Phase 1 (P1): Replenishment begins with the first irrigation and ends at the first runoff, typically 1-3 hours after lights-on. Climb from overnight minimum water content (WCmin) to maximum (WCmax) while pushing substrate EC from peak (ECmax) to target minimum (ECmin). Reach runoff within roughly three hours.
Phase 2 (P2): Maintenance runs from the first runoff to the last irrigation. Hold water content in the target range, maintain steady inter-shot dry-backs matching your steering intent, and manage EC through shot frequency and runoff percentage.
Phase 3 (P3): Overnight Dry-back spans from the last irrigation to the next morning’s first irrigation. Achieve target overnight dry-back and arrive at morning’s WCmin and ECmax targets by lights-on. Controlled water stress builds overnight.
Five Practical Control Dials
These irrigation parameters are among your most direct tools for manipulating root-zone water stress. Specific numbers vary by facility, substrate, and cultivar.
Start-of-Day Delay (SOD) controls P1 dry-back magnitude: how thirsty plants are when irrigation begins. A longer SOD (60-120 min) creates a deeper morning deficit and a more generative signal. Shorter SOD (15-45 min) provides quick recovery and vegetative support.
Shot Size controls WC climb rate and inter-shot dry-back intensity. Larger shots spaced further apart (6-10% of substrate volume) create bigger inter-shot dry-backs (4-6%) for sustained generative pressure. Smaller shots (2-4%) provide tight control and vegetative stability.
Shot Frequency controls how often WC is replenished, working in both P1 and P2. In P1, a higher frequency accelerates the climb to runoff. In P2, frequency determines the magnitude of inter-shot dry-back and daily runoff accumulation. A higher frequency (every 45-90 minutes) helps maintain WC levels, with smaller inter-shot dry-backs, promoting vegetative stability. Lower frequency (every 2-3 hours) allows for larger inter-shot dry-backs, facilitating a generative rhythm.
Cut-off Time controls P3 duration and overnight dry-back. An earlier cut-off (4-6 hours pre-lights-off) creates a long P3 with a large dry-back (20-25%) for strong generative pressure. A later cut-off (1-2 hours) creates a shorter P3 and a vegetative lean.
Feed EC Strategy controls osmotic potential, the energy cost of water uptake. Higher feed EC (targeting a substrate of 6-12 mS/cm) establishes a generative baseline stress. Lower feed EC (substrate 4-7 mS/cm) supports vegetative growth. Always ramp substrate EC gradually.
These five dials work together. Pushing all five toward generative settings creates strong generative pressure. Pulling toward vegetative settings supports growth and expansion.
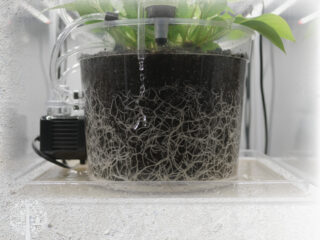
Dial Settings by Growth Phase
Here’s how to apply these controls across major growth phases. These are starting points; tune to your cultivar’s response.
Early Vegetative: Rapid Structure
Goal: Fast structure with minimal timeline.
Moderate vegetative bias: SOD 15-45 min, shot size 3-5%, frequency every 45-90 min, cut-off 2-3h pre-lights-off, feed EC 2.5-3.0 mS/cm (substrate 4-6 mS/cm).
Effect: Moderate P1 dry-back, tight inter-shot control, moderate P3. Plants stay hydrated without saturation.
Early Flower (Week 1-3): Stacking
Goals: Earlier flower site initiation (save 3-5 days), max flower sites/ft², dense nodes, minimal stretch.
Strong generative pressure: SOD 90-120 min, shot size 6-10%, frequency every 30-90min, cut-off 4-6h pre-lights-off, feed EC 3.0-3.5 mS/cm (substrate 6-12 mS/cm).
Effect: Deep P1 dry-back, large inter-shot dry-backs (5-6%), extended P3 (20-25% overnight), elevated osmotic pressure. Early flip signal, tight internodes, minimal stretch.
Revenue impact: 3-7 days faster to flower = 5-10% more cycles/year. Compact structure = higher flower sites/ft².
Mid-Flower (Week 4-6): Bulk Building
Goals: Rapid expansion, fast bulk accumulation, and maintained turgor.
Return to vegetative support: SOD 30-60 min, shot size 3-5%, frequency every 45-90 min, cut-off 2-3h pre-lights-off, feed EC 2.5-3.0 mS/cm (substrate 4-7 mS/cm). Higher runoff (25-30%) flushes accumulated EC.
Effect: Moderate P1 dry-back, tight inter-shot (2-4%), moderate P3 (12-18%), lower osmotic resistance. Low-stress period with high water and nutrient availability increases yield by allowing cells to maintain turgor and expand efficiently.
Revenue impact: Faster bulking = earlier harvest and higher yield. Higher yield per ft² from optimal expansion conditions.
Late Flower (Week 7+): Ripening
Goals: Secondary metabolites, controlled finish, quality focus.
Return to generative: SOD 60-120 min, shot size 6-10%, frequency every 45-120min, cut-off 4-6h pre-lights-off, feed EC 1.6-3.0 mS/cm (substrate 6-8 mS/cm, often taper nitrogen).
Effect: Deep P1/P3 dry-backs resume, large inter-shot (4-6%), elevated EC, reduced night moisture. Metabolism shifts to defense compounds.
Revenue impact: Higher quality grades = 20-40% premium pricing.
Transition Principles
Shift gradually by changing 1-2 dials over 2-3 days. Watch turgor; wilting or tip burn means you pushed too hard. When ramping EC, increase feed EC in 0.2-0.4 mS/cm steps. Cultivar variation matters: some need gentler transitions.
The Foundation: Prerequisites Before You Steer
Crop steering is precision tuning, not rescue protocol. Verify fundamentals first:
Sensor accuracy: Substrate sensors require high-quality components and must be placed consistently and accurately. Any “noise” that comes through from poor uniformity or low-quality hardware in sensor placement will feed into poor crop steering decision-making.
Irrigation uniformity: Make sure all of your emitters are flowing at a consistent and uniform rate across the room. Distribution uniformity (DU) ≥ 0.85 minimum, target ≥ 0.90. Test 16 emitters × 1 minute. Fix pressure issues, clogs immediately.
Environmental stability: VPD, temperature, PPFD controlled to targets. Adequate air movement. Managed disease/pest pressure.
Without these, steering inputs won’t produce predictable outputs and can have net-negative effects on $/ft2/day.
From Theory to Profit
Part 1 explained water potential, the science behind plant responses. This article provided practical implementation: five irrigation controls that manipulate water potential across three daily phases to achieve specific agronomic outcomes.
The connection to revenue is direct. Earlier flower initiation = more cycles/year. Dense flower sites = higher yields/ft². Faster bulking with optimal conditions = higher total yield. Quality finishing = premium pricing. Each improvement compounds to drive $/ft²/day upward.
Master these controls, understand what each affects in the root zone, and you’re steering toward measurable goals that drive profitability.
The root zone is your joystick. Steer with intention.

- Tyler Simmons
Trending Articles Today
Similar Articles
5 Cool Ways to Master Crop Steering
Crop steering isn’t complicated! These 5 tools help you manage VPD, lighting, irrigation, pH, and plant training for stronger, more resilient crops.
Plant Steering in Organic Container Systems: Working With, Not Against, the Soil
Switching from hydro to soil? Learn how organic container systems and living soil changes plant steering, feedback loops, and grower intuition.

Mastering Moisture in Living Soil: How Tensiometers Transformed My Gardening
Achieving perfect moisture levels in living soil can be tricky. Gareth Hopcroft introduces us to a tensiometer, a tool that’s transformed how he grows plants.
