In two previous articles, we discussed some requirements for the successful tissue culture of plants and fungi. Some specific laboratory techniques were mentioned, but perhaps not in sufficient detail to be able to confidently implement a good “sterile technique.” This last article in the series aims to improve upon that.
What Is Sterile Technique?
“Sterile technique” describes the many procedures that minimize, as far as possible, the introduction of contaminating organisms into an experiment or culture. This includes everything from proper dress to wiping down work surfaces with disinfectant, autoclaving and distributing liquids and solids, sterilizing tools using disinfectants or flaming, and following the correct sequence of operations when performing transfers between culture vessels such as flasks, Petri dishes or test tubes. The work can be carried out in the open, but contamination rates are greatly reduced if an effort is made to clean the air in the work area. This is accomplished by using sterile culture hoods, also called laminar flow benches, high-efficiency particulate Air (HEPA) filter hoods, or similar descriptors.
Why Sterile Technique Is Important
It is vital to protect tissue cultures from contamination by laboratory workers. Humans are a great source of microbes that can easily find their way into a flask or Petri dish. Therefore, it is essential to cover up as much as possible with clean, long sleeves (lab coats that never leave the lab are recommended), hair and beard coverings, and rubber gloves—preferably nitrile. Before starting work, wash gloved hands with 70% isopropyl alcohol (isopropanol).
Many disinfectants are available for household and laboratory use, but it is hard to beat 70% isopropanol for cost, effectiveness, and safety. Why 70%? A lower percentage is not as effective. A significantly greater percentage causes immediate damage (coagulation) to cell membrane proteins, which interferes with further uptake of the alcohol solution into the cell; 70% is the way to go. Even when using a flow hood, wiping the work area from top to bottom with 70% isopropanol is advisable.
Sterilization Tools
There are no shortcuts to sterilizing liquid or solid culture media. A device capable of maintaining a temperature of 121°C at a pressure of 103 kilopascals (250°F at 15 PSI) for up to several hours is required. The good news is this is well within the range of standard pressure cooker/canners and instant pots. The major limitation of an instant pot is its volume. Electric or gas-fired pressure cookers are available in larger sizes for larger-scale operations. In any case, sterilize liquids for at least 15 minutes (larger volumes require longer) with a slow return to atmospheric pressure to avoid boilover. Solids and glassware require one to four hours but can be vented to the atmosphere immediately.
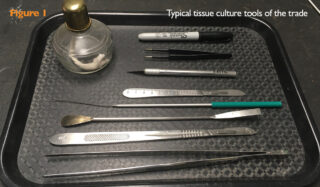
The tools of the trade include scalpels, razor blades, knives, spatulas and loops (Figure 1). These can be wiped down with 70% isopropanol and allowed to evaporate or dipped in 95-99% isopropanol and passed through a flame. The flame can be provided by an impressive device like a “Bacti-Cinirator” that sterilizes using infrared radiation or a simple alcohol lamp. Loops cool relatively quickly after flaming, but larger items like blades require longer.
How To Do It
The most skill comes into play when working with live cultures. The best way to learn how a transfer between plates (Petri dishes), tubes, or flasks is done by watching someone else do it and then practicing a few times. There is no substitute for hands-on training, but plenty of YouTube videos do a good job of demonstrating it. Here are two standard techniques:
(1) Plate-to-plate transfers. Sterilize the tool. Hold the tool in your dominant hand, and with the other hand, carefully lift the cover from the source plate while still holding it over the medium surface. Use the tool to collect a sample from the plate and return the lid as quickly as possible. Lift the cover above the receiving plate the minimum amount required to be able to transfer the sample from the tool to the medium surface. Replace the cover quickly after the transfer is complete. Sterilize the tool.
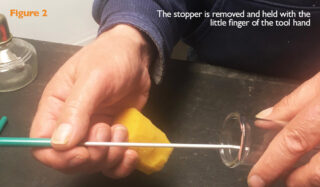
(2) Tube and flask transfers. Sterilize the tool, often a small loop in these cases, especially for liquid cultures. The flask or tube will have either a screw cap or a plug. It works the same for either a tube or a flask. Hold the tool in your dominant hand and the tube in your non-dominant hand. Use the small finger of the tool hand to remove the cap or plug from the tube and hold it there (Figure 2). Pass the neck of the tube through a flame. This heats the air in the neck and forces it outward. Extend the tool into the tube to collect or deposit a sample, flame the neck again and re-attach the plug or cap. Flame the tool to sterilize it and let it cool for the next operation.
Home Tissue Culture Kits

Many would consider a sterile culture hood an essential piece of equipment for tissue culture. Unfortunately, commercial units run from $500-$2,500, although some small tabletop models are now available for less than $200. It so happens that a flow hood is something that can be built from scratch relatively easily, for much less than half the cost of a pre-made one. Figure 3 shows a small tabletop unit consisting of a plexiglass work enclosure and a top-mounted fan that blows through several MERV 13 filter material layers. The efficiency is not quite up to that of a HEPA filter at 99.97% at 0.3 μm but is somewhere around 95%, which is a significant improvement over no filtration. The enclosure is fabricated from standard extruded aluminum T-slot bars and hardware. It was originally built to use a small vacuum cleaner HEPA filter purchased at a garage sale for a dollar, so the filter is mounted in a small opening on the top of the cabinet. Not ideal, but it works. Usually, you want the air blowing linearly forward from the back (laminar airflow) so that any airborne particles are flushed straight out of the work area with minimum turbulence.
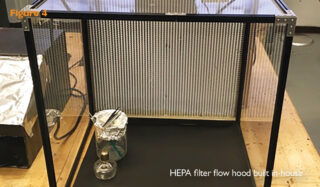
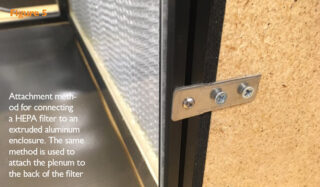
A better design with a HEPA filter, although not as space-saving, is shown in Figure 4. This unit has a plywood plenum (an enclosure that holds low-pressure air) to keep a top-mounted fan with speed control. Once again, the work zone is a plexiglass enclosure in a T-slot frame. The plenum is mounted to the filter, and the filter is mounted to the enclosure. Running this unit with nine exposed nutrient agar plates for a half-hour resulted in 0% contamination.
For anyone interested in pursuing plant or fungal tissue culture, the techniques we have discussed are covered and demonstrated in many articles, books, and websites. So do more research, get some equipment, and build some of your own.