This article written by Ryan Martinage was originally published in 2015 Garden Culture Magazine UK Issue 5, where it appeared under the same title.
You can buy liquid fish just about anywhere garden fertilizers are sold, so why bother messing around with DIY fish fertilizer? It’s liquid gold – the best possible 100% natural plant food.
Thanks to the many benefits gained using inputs made from fish in gardening, fish-based products are a familiar sight within the retail gardening industry. With all the products on the market, the liquid fish fertilizer segment has two separate categories: fish hydrolysate and fish emulsion.
Outside of specialty gardening shops, fish emulsion is the product most commonly found. This is most unfortunate for the average organic gardener. Fish emulsion production is like hydrolysate, in that both source their ingredients mainly through byproducts of the fishing industry. The manufacturers use fish heads, bones, organs, scales, and fins, but this is where the similarities between the two end.
Emulsifying fish is a hot process. They heat the fish materials to extract oil for commercial purposes, as well as protein in the form of fish meal for gardening or animal feed. When the extraction processing finishes, the brown slurry that’s left gets bottled and sold as fish emulsion. It’s a dead product. This form of liquid fish is devoid of organic compounds. They get burned off in the emulsifying process leaving varying concentrations of nitrogen, phosphorous, potassium, trace elements, and a high concentration of chlorine – which is harmful to beneficial microbes in your garden. That being said, this is not the type of fish fertilizer we will be focusing on. Let’s get acquainted with the good stuff, fish hydrolysate.
Fish hydrolysate comes from the same inputs as fish emulsion, but the key difference is that it’s made using a cold, and all natural process. Without the heat, there is no breaking down of the beneficial organic compounds that are naturally present in the fish carcasses. All of the vitamins, amino acids, and fish oils remain in the product.
Typically, when creating fish emulsion, the fish parts are turned into a substance called ‘gurry’. This gurry is basically fish + blender. When the fish parts are ground into bits, the exposed surface area increases phenomenally, making it easier for the enzyme-powered digestion process to occur. After making the fish parts into gurry, it’s added to water along with an enzyme concentrate. After a period ranging from a few days to over a week, the solution is then strained and stabilized. Phosphoric acid is most commonly used as the stabilizer to prevent further decay, and enables the product to have a shelf life.
The good news for you? This complicated sounding processing is more than what is necessary to make a fantastic liquid fish input. If you want a high quality product at a great savings, keep reading. Should you run out of homemade fish fertilizer, or simply don’t wish to make it yourself, don’t just buy anything fishy. Always stick with cold-processed fish hydrolysate. Check the product label. It’s often stated by the manufacturer that it’s made using a cold process, or is a hydrolysate.
Now it’s DIY Fish Fertilizer Time!
I’m going to tell you how to make fish hydrolysate using fermentation as our cold process of choice for many reasons. Chief among them is you need no special commercial enzyme concentrates, no acid stabilizers, and it doesn’t smell bad!
Here is a list of what you will need:
- 1-part Fish or Fish Scraps
- Blender or Food Processor
- Lactobacillus
- 3-parts Dechlorinated Water
- ⅓-part Brown Sugar
- Airtight Plastic Jug
- Home-Brewing Airlock
- DIY instructions below
 Where does one get fish scraps? Inquire at local fish markets. Naturally, you can also catch your own. Finding lactobacillus is easy. It’s available from your local pharmacy next to the vitamins. Remember – chlorine kills microbes, so be sure you use dechlorinated water or well water. I’ve given the measurements in parts to deal with different sized blenders or food processors, and get the ratio of ingredients right.
Let’s Get Started
1. Depending on how much you want in the end, you may have to do several sessions with your blender. Be sure to take into account the maximum volume of your blender when figuring the parts measurements.
- Chop up the fish, or fish parts, as small as you can to help the blender/ processor.
- Place bits into a blender. The amount you prepare is your 1-part of fish.
- Add your 3-parts of water, and ⅓-part of brown sugar.
- Blend until smooth! This can take several minutes.
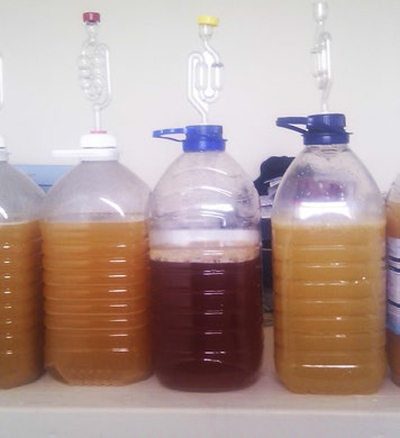
- Pour into your fermentation vessel (plastic jug, bottle – anything with a cap.)
- Repeat process if you wish to make more gurry.
2. With your gurry ready, we need to get ready to ferment. For our fermentation to work, we need to add lactobacillus to our mixture. We’re using an over the counter lactobacillus from my local pharmacy. It is possible to harvest and cultivate your own wild lactobacillus culture, but that is for another time!
- Add 4 lacto-pills to your mixture per blender-full of gurry. Stir well.
- If you purchased a pre-made airlock, fill it with water and screw on your jug/vessel. If you wish to make one yourself, see the next section!
- Let the jug ferment until there are no more bubbles appearing in your airlock. This is usually a 7-10 day period. If you are in doubt, or bubbles are getting scarce, the smell disappearing is a great indicator you’re done!
About that DIY Airlock…
This is an inexpensive item if there’s a home-brewing store handy. Even so, I believe making your own airlock just adds to the DIY experience of this fish fertilizer! We must use an airlock for a true anaerobic fermentation of our gurry.
You will need:
- 6.4mm Grommets (2)
- 6.4mm Flexible air hose (As much as needed)
- Water-filled plastic bottle
Putting it together:
1. Consult the grommet manufacturer’s literature, drill the proper sized a hole into the lid of your fermentation vessel to accommodate the grommet. Do the same on the bottle that you will fill with water.
2. Drill a second small hole next to the one made for your grommet. THIS IS IMPORTANT. This second hole allows gasses to escape from the fermentation vessel.
3. Add water until the water bottle is ¾ full. Insert your 6.4mm hose into your fermentation jug through the grommet just 50mm or so past the lid. Do the same with the water bottle, but insert the hose through the grommet until the hose is underwater and at the bottom of the water bottle.
When the processing finishes, use at 30-60 grams per 4-litres as a fertilizer. You can also add 15 grams per 4-litres to compost tea. Thank you so much for reading! I sincerely hope this knowledge can get you one step closer to producing the best all-natural plant food possible.
11 Responses
So do you just pour this mix onto your garden soil with the plants once it’s done?
I will surely try this fertilizer, am a plant scientist, specifically anplanr pathologist, interested I try out new and simple methods of enriching plants at home and work place, thank you very much
There are maggots in the jar. Is it normal?
Hi,
Thanks for the article. I’m just wondering about the quantity of lactobacillus pills. You say 4/blenderful. how big is the blender?
Thanks,
Thea
I wouldon’t you also teach me about phosphoric acid base stabilization process
I am a fresh water fish farmer in Bangladesh and average yield is 50 to 60 tonnes per year. Some times accident such as lower oxygen concentrations, stress after partial harvesting occurs and huge fish die. Those dead fish are not marketable so we suffer from severe money loss.
To utilize these fhish, only way to produce fish hydrolysat but not for my own use, instead commercially marketable fish hydrolysate.
So could you teach me phosphoric acid based stabilization process so that the product can be stored on the selves at least for 1 or 2 years.
I thank you very much for a good website of fish based fertilizer. I learned a lot from you.
Sincerely
ATM Zakaria
Gazipur
Bangladesh
Hi. I really enjoyed reading Ryan’s article & am keen to give this a try. Would it be possible for him to post some photos of the set up please? I’m a visual learner & some pics would be really helpful. Thanks in advance.
Hi Kathy,
I’m glad you enjoyed the post! Unfortunately, it’s a few years old now and we don’t have any photo’s of the setup. Have you checked out YouTube? I was able to find quite a few videos on DIY fish fertilizers. Best of luck!
WHEN YOU SAY ONE PART, WHAT DO YOU MEAN AS A PART, IS ONE PART ONE KILO OF FISH???
Hi Terry,
A part is a measurement in the form of a ratio. It could be any amount (cups, ounces, kilos, etc…) and will depend on the total quantity of fish fertilizer you need. I hope this helps!
Interesting.