This article was originally published in Garden Culture Magazine US19 & UK21.
Creating a good IMO collection is the fundamental principle of successful KNF practice. Microbial soil fauna makes it all possible. This article shows you everything you need to know to harvest your beneficial microbes, courtesy of Korean Natural Farming.
Apex Chumps
Humans love to think they are the pinnacle of Nature’s handiwork. We reckon we have got it all nicely sewn up, perched proudly at the top of the food chain with all arrows pointing straight towards us. What we casually forget to realize a lot of the time is that we are a food source, but just not for something with big muscles or sharp teeth. Microbes love a little bit of man flesh, and they have developed all sorts of techniques to get it. Infectious diseases kill over 17 million people a year around the world, according to the World Health Organisation. They are incredibly resourceful little feckers.
On the flip-side, they aren’t all bad. Every ‘yin’ has its ‘yang’ and microbes are no different. There are all sorts of good things microbes can do for you, and this article is all about harvesting the ones most suitable for plants! Plants have evolved over millions of years alongside bacteria and fungi, so by isolating them and plonking them into a sterile growing media, you couldn’t be creating a more unnatural environment for them. Some plants (e.g., orchids) won’t even germinate without a microbial association. A diverse bacterial and fungal association can be key to opening a plant’s full genetic expression, enhancing those three magical F’s: flavor, form, and function.
What the blazes are IMOs?
Indigenous Microorganisms (IMOs) are free-range microbes. Bacteria and fungi that naturally occur all over the world, in their natural habitats. Having diverse climates around the globe gave rise to a hugely varied range of microbial life, each with their functions and benefits. What we are doing here is targeting and harvesting the ones we think most suitable for our grow rooms. Don’t just isolate yourself to a pack of spores from the dusty shelf of your local hydro store; you have the entire natural world at your fingertips!
IMOs (and the use thereof) occupy a few distinct stages within the Korean Natural Farming practice. Here we are going to look at the first two stages, IMO 1 and IMO 2. The first stage is collecting the microbes, and the second stage is storing them. Once you get to the second stage, you have a usable inoculant for almost any application. So, for example, rather than going through all the IMO steps 1-5 (ending up with an awesomely active potting compost), you could use your IMO 2 only as an inoculant for a more typically hydroponic media, like coco.
Why even bother doing it though?
Yes, I can imagine the lazier ones of you thinking, “Eff that bro-chacho, homeboy here can just buy me a bottle of mike-o-rowsha and save my precious time to chong down some epic doinks, Jeheeez!” My response to this would be a shake of my head and a kiss of my teeth followed by a quick retort about the variety being the spice of life before moving on to the effectiveness of correctly-sourced local microbial life. Then, most likely, I’d follow up those fact-bombs with some witty analogy about how far you’d get in life by only ever having one friend.
In a fully functioning soil food web, variety truly is the spice of life. While some specific strains of fungi or bacteria are known to have benefits (Trichoderma or Mycorrhizae), the whole theory is to go for maximum diversity of bacteria, fungi alongside higher level ‘recyclers’ of organic nutrients like protozoa and flagellates. Combining this diversity with the principle of targeting groups of microbes from particular forests or wildlife areas that share characteristics with your grow room (or associations with your crop) leave you with an extremely active and unique microbial culture. This micro herd will provide the basis for all the nutrients, proteins, enzymes, and amino acids your plants could want, all from an organic source, and improve the overall soil structure as they do so.
Where would you get them?
This is possibly the most important question you could ask yourself when looking to start an IMO collection. You want to target areas that will offer a rich microbial life. Ancient forest areas will likely provide a wide range of bacteria and fungi, having been untouched by our destructive human hands as much as possible. Fungi particularly are a lot slower to establish and generate than bacteria, so intact and undisturbed natural areas are good to look for when making an IMO. Glancing around the forest floor for dead wood with visible mycelium on it will indicate whether the area has a nice and healthy microbial population.
Areas immediately surrounding the crop that you are growing can also be beneficial to harvest microbes from, as they are more likely to have a direct association with the crop you’re cultivating. For example, harvesting microbes from woodlands surrounding fields of corn may well have more beneficial microbial life specifically for growing corn. Also, you need to think of the climate that you will put the microbes in. For example, a grow room with a significant temperature difference between night and day would benefit from microbes already acclimated to a similar environment in the natural world.

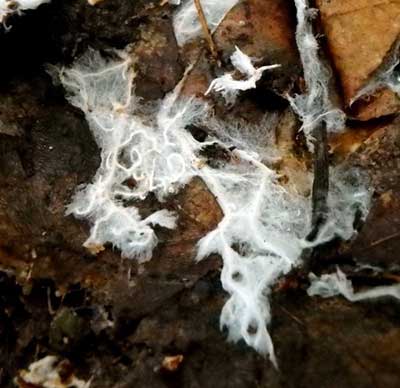
Mycelium growth is easily visible on material on the forest floor. You will see white spider-webby strand type growth over dead and decaying organic material. If the mycelium is visible, then you know you are dealing with beneficial microorganisms. You know it’s good as visible mycelium is 4µm (micrometers) or larger, and disease-causing fungi are usually much smaller than this being less than 1.5µm, not visible to the naked eye.
How to make IMO’s
Now, you have a rough idea of where you need to collect your microbes. So, what will you need to do it?
You will need:
- A Container
- Some rice
- Some paper towels
- A stapler
- A protective cage
- Rain cover (tarp/umbrella)
- Optional OHN and FPJ
- Brown sugar
- Scales
- Mixing container
- Storage container
Dry cook some rice
Wash your rice (saving the water to make some LAB if needed) and then add 1 ml/L of OHN and 2 ml/L of FPJ to the rice, to make the rice slightly more appealing to beneficial microbes. Fully cook the rice, but not to the point where it sticks together and clumps up. You want granular rice, to allow for maximum airflow throughout the mass. Yes, we all have different rice cooking methods, but using just over half the water, you typically should get the consistency you are looking for. Cooked, but dry and still granular, maybe slightly al dente!
Fill the container
Fill the container with the rice. The containers used are typically wooden and breathe well. Avoid anything made from materials treated with any chemicals that will be bad for microbes. If there are none, pop some holes in the base of the container, to provide airflow and a little ‘ladder’ of fallen bits of rice for biology to ‘climb’ up. Fill the jar with rice to the halfway point, and cover the top with a paper towel, securing it in place with a stapler. This provides a breathable lid and a pocket of air above the rice that creates an environment for the microbes to breed.
Place the box
Take the box to the spot where you have found a good source of biology. Put the box on the ground, gather up some nearby material with visible mycelium and place both underneath and around the rim of the box. Do not put it in the middle of the paper lid as it may sag and tear. Place the protective cage over the box to prevent rodents from getting in. Set up the tarp or umbrella over the whole thing to protect the box from rainfall, but still allow for good airflow.
Come back a few days later
After 4-5 days, you will have your IMO 1! It is best to avoid harvesting on a rainy day, or a day immediately following a shower, but sometimes this can’t be avoided, just try to avoid any excess moisture getting in. When you pull back your paper lid, you should see a nice white and /or light grey fuzzy mass all over your rice. It will now be a little biological cake, packed full of beneficial life from the surrounding area. If you see any angry-looking black moulds or it has a nasty smell, be wary about using it, you may not have got the best of batches that time.
Putting the microbes into storage
This is where you make your IMO 2. Weigh the mass of the rice. Then add to it an equal weight of brown sugar, sometimes slightly more. Gently massage this into the rice in a big container making sure you have evenly distributed and mixed the rice and sugar without being too vigorous or aggressive about it. Adding the sugar draws the moisture out of all the biology, forcing them to sporulate and essentially go into a cryo-sleep, ready to use at any given later date.Once mixed, it will start to feel slightly wet, and now you need to put it into a suitably sized storage container. However, if you think the mix has become too wet, then add some more sugar to draw up some of the excessive moisture. If the biology becomes active and begins bubbling from too much moisture, it will quickly become less effective.
C’est Fini – Now what?
That’s it! You now have some unique, indigenous microbes to use at your leisure. Make sure you label, date, and store them in a cool, dry place. Check it periodically. If you start to see it bubbling at all you need to add more sugar to stop the activity quickly.
Now, you need to create a diverse IMO collection, as diverse as possible, so get back out there and get some more! Diversity is key, so gather microbes from as many different locations that you think would possibly be beneficial, then use a bit of them all when it comes to the inoculation stage. Not only will you have a great range of biology, but also have had a few pleasant excursions into some forests from it as well!
More on Korean Natural Farming:
- A Guide to Korean Natural Farming
- Korean Natural Farming: Master Cho Biography
- Korean Natural Farming and Indigenous Microorganisms
- Korean Natural Farming: Feed Ferment To Your Plants
- Korean Natural Farming: DIY Organic Growing Inputs
- The Fundamentalists of Korean Natural Farming
- Korean Natural Farming: DIY Water-Soluble Organic Nutrients
- Korean Natural Farming: DIY Herbal Remedy For Plants
- Merging Hydroponics With Organics In Korean Natural Farming

5 Responses
You are using acronyms without first defining them. This creates a barrier to understanding. OHN, LAB, FPJ… presumably critical ingredients to this method, and I have no clue what you are talking about.
Fair point! We will update the article for clarity.
Please explain OHM and FPJ. Tks much. This is fascinating to learn for my Garden.
Great info! I heard of this technique used in India when modern farming depleted the soil and it was no longer able to grow anything. So cool!! Thank you for sharing all the steps to do this. I especially love the storage method tips. Explaining the acronyms for us newbies would be great (OHN, FPJ).
Thank you Nico,
With your details of how to make IMO I’m going to try it, hoping & praying to succeed as my goal is to apply it to my small farm which I call Promise Land (PL)
Have a good week & stay safe,
GBU,
Sudhir
Sudhir, Bengaluru, India.
email: sudhir.gse07@gmail.com
Cell: 00919513792472