As grocery prices continue to rise and people seek more effective ways to nourish their bodies, food preservation techniques are gaining renewed attention. The simple act of preparing and enjoying meals with homegrown produce throughout the year is incredibly gratifying! The first step to successfully preserving your bounty is proper harvest. This edition has offered many tips on that topic. Now that you’ve foraged in the garden like a pro, let’s explore some of the 5 Cool Ways to Preserve a Harvest.
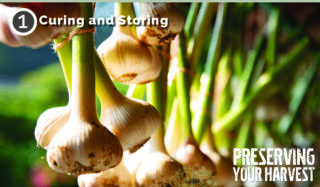
1. Curing and Storing your Harvest
There is nothing more nightmarish than harvesting pounds of onions and garlic and storing them for the winter, only to find them rotting. This real-life horror show will play out for gardeners who fail to properly cure their harvest before storing it in their cold rooms. Several food and medicine crops require curing before storage, including garlic, onions, potatoes, sweet potatoes, winter squash, dry beans, and peas. The curing process doesn’t require much effort, just time. To prepare onions and garlic for storage, harvest them from the garden without puncturing their skin. Spread them out in a dry and well-ventilated room for about two weeks; they’re ready when their necks have hardened. Like potatoes destined for storage, refrain from washing them until you’re ready to cook with them. Peas and beans are cured in their pods and can dry on the vine. Bring them indoors only once the pods are brown and papery. Once inside, place them in a warm, dry spot for two weeks, then open the pods and remove the seeds. Store them in a Mason jar with a lid or a paper bag.
2. Freezing your Harvest
If you have the extra space, freezing a harvest is a quick and easy process. Freezing preserves the taste and nutritional value of a crop by stopping the growth of microorganisms and slowing enzyme activity. Use eco-friendly packaging, squeeze out all the air, and properly label the produce type and the date you froze it. Place the items in an even layer and wait until they’re fully frozen before stacking. Some vegetables, such as broccoli, kale, green beans, corn, and cauliflower, require quick blanching before freezing. Boil them for a few minutes, then transfer to ice water to stop the cooking process. Berries can be placed directly into the freezer after washing and drying, but fruits like apples and peaches should be dipped into a lemon juice solution to prevent browning. Pro tips: Consider dicing peppers, onions, and carrots to freeze for a ready-to-go spaghetti mix. If you live in a region where corn is abundant, buy it in bulk from a local farmer at a fair price toward the end of the season. Spend an afternoon peeling and blanching the corn, then removing the kernels from the cobs. Freeze it in bags and enjoy delicious, locally grown corn all winter long!

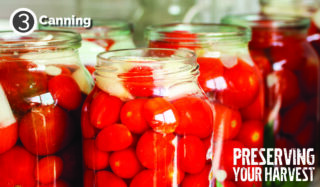
3. Canning your Harvest
Have you ever blanched, peeled, and slowly simmered 40 pounds of tomatoes on the stove into a mouth-watering pizza sauce or marinara, canned it, and enjoyed it almost weekly for months after? If your answer is no, then you haven’t really lived. Garden Culture’s executive editor (and first-time canner), Catherine Sherriffs, is still opening cans of sauce from last summer’s tomato harvest! Sarah Thrush, author of Preserving with a Purpose: Next-Generation Canning Recipes & Kitchen Wisdom, is a phenomenal teacher of this tried-and-true preservation method. Whether it’s a water bath (for high-acid foods) or pressure canning (for low-acid foods), when done safely and correctly with the proper materials, canning can result in significant savings at the supermarket and boost the nutritional content of all your meals. A pressure canner is a one-time investment that pays for itself quickly when you consider the number of jars of preserved food you’ll have in your pantry. We won’t claim that this is the easiest way to preserve your harvest, but we will say that, from start to finish, it’s one of the most enjoyable processes we’ve ever experienced—slow, delicious, and incredibly worthwhile.
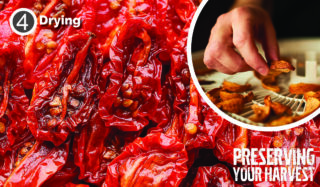
4. Drying your Harvest
Drying food simply involves removing moisture from fruits and veggies to inhibit bacterial growth. If you have an abundance of herbs you’d like to preserve for cooking or steeping, air-drying on screens or hang-drying them in a well-ventilated area will do the trick. Oven drying is an option, and freeze-drying or dehydrating are also effective methods, but they require special equipment. Produce that has been properly freeze-dried can last up to 25 years because the process removes approximately 99% of the moisture. Other methods typically only remove 70-90% of a food’s moisture content and can only be stored for about a year.
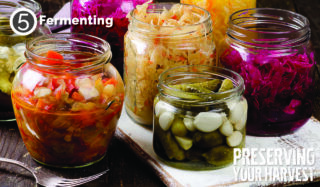
5. Fermenting your Harvest
Fermented foods are taking the world by storm for their incredible nutritional value, their benefits for gut health, and because they’re super fun to make! Fermentation uses beneficial bacteria to preserve and boost the nutrients in our food, even adding essential probiotics to support digestive health. It involves cleaning and chopping fruits or vegetables and either placing them in a brine solution with salt and water (or their natural juices) or packing the sliced produce in a fermentation vessel and covering it with brine. For the latter, use a weight to keep the veg submerged. Fermentation takes place at room temperature; check it often and remove surface mould. Once complete, store your fermented product in jars in the fridge.
Great Gardening Resources:
- Nettles & Petals: Grow Food, Eat Weeds, Save Seeds by Jamie Walton
- Kitchen Garden Living: Seasonal Growing and Eating from a Beautiful, Bountiful Food Garden by Bailey Van Tassel