There’s something special about starting new seeds, isn’t there? Even after years of gardening, the thrill of opening a new pack of seeds never gets old. However, some seeds can be costly, so beginners need to get the basics right to avoid wasting time and money. Let’s dive into the essentials:
This tip is crucial! Take the time to source a reputable breeder instead of impulsively buying from a random pollen-chucker on Instagram. I have been using a Dutch seed supplier in operation since the 1980s. (Hint: “Masters at Work.”) I can vouch for the consistent quality of their seeds and the passion that goes into making them. Also, buying seeds only when needed is best unless you’re snagging a limited-time offer. When you acquire seeds, store them in the fridge until you’re ready to plant.

A helpful rule of thumb is to plant seeds at their own depth. Tiny seeds (like onions) can be lightly pressed into the growing medium’s surface and then covered with a thin layer of soil or vermiculite. Bury bigger seeds no more than their width. If you’re dealing with larger seeds that are scarce, challenging to germinate, or pricey, try placing them between two layers of a moist paper towel. Once you see a root, carefully transfer them to your propagation medium.
Opt for a propagation potting mix specially designed for seed starting. It should be lightweight, sterile, and well-draining. Alternatively, consider Rockwool starter cubes, which are fibrous cubes ideal for seed germination. No need to add nutrients; plain water works fine.
Overwatering and underwatering are common issues when caring for seedlings (and cuttings). Your potting mix should stay consistently moist, not soggy. A spray bottle is perfect for gently misting the surface, avoiding seed displacement. Seeds can suffocate and rot if submerged in water, so be mindful of this. To help retain humidity, cover your pots or trays with plastic.
Temperature is vital for seed germination. Seeds and seedlings prefer stable temperatures. That’s why some growers prefer 24-hour light cycles post-germination. For warm-season plants, aim for 77 to 81°F (25 to 27°C) while your seeds germinate. If using a propagator, monitor the internal temperature with a thermometer. In case of excessive heat, try raising your propagation lights, opening vents, dimming lights, or boosting ventilation. For cooler conditions, a heat mat can help maintain the right temperature. Always connect your fan to a thermostatic speed controller. Modern speed controllers have humidistat-based control, too.
Many seeds don’t need light for germination, and some are even hindered by it. But post-germination, seedlings need ample light to grow strong. Insufficient light leads to seedlings that are tall, thin, and weak (often referred to as “leggy”).
Damping-off is a fungal disease that can quickly kill seedlings. It is caused by overwatering and poor air circulation. To prevent it, be cautious when watering and ensure good air circulation. A fan can help. Look for seedlings that suddenly collapse, with a thin, darkened area at the soil line – these are signs of damping-off.
Once your seedlings have at least two sets of true leaves (the ones appearing after the initial seed leaves), they’re ready to transplant. Handle them gently to avoid root or stem damage. Acclimate them to their new environment gradually by exposing them to outdoor conditions over several days.
Young seedlings are sensitive to nutrients. It doesn’t take much to cause nutrient burn, which can damage them. Start fertilizing only when they have their second set of true leaves. Use a balanced, water-soluble fertilizer at half the recommended strength, gradually increasing as they grow.
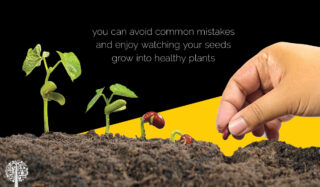
Propagation is an area where every new grower should focus. It might require a fair amount of attention to detail, but with the proper techniques and daily care, you can avoid common mistakes and enjoy watching your seeds grow into healthy plants.
Don’t give up on old seeds you have lying around the house. It’s possible to revive them! Cody J. Garrett-Tait has some tips on helping forgotten seeds sprout.

Many consider their tomato plants to be a true reflection of their gardening abilities! Here’s how to transplant delicate seedlings into bigger pots.

A very special story about a Mother-Son relationship and the lengths a Green Thumb will go to help out a Brown Thumb, told by Regi Oneton.