With gravity irrigation, you can water plants anywhere, in the ground or in containers, even if there’s no electricity available. These systems work by taking advantage of water’s ability to travel the path of least resistance all on its own. You don’t need any pumps and can use this for watering your garden temporarily or all season long. It is best used on individual plants, small clusters, or row crops.
Without a pump, you need a reservoir. You can fill it with collected rainwater, from the hose, or transported from nearby a pond or stream. The water moves to your plants’ roots through drip irrigation. Just don’t forget to check your water level. It will run out faster than you expect during a drought or a dry climate, especially as your plants grow larger. You can also add fertilizer or nutrient supplements to your irrigation reservoir.
 Since delivery of gravity irrigation is via drip rather than spray, it conserves water. And if constructed right, you can use it for sub-irrigation, reducing evaporation loss even more. However, below the surface drip irrigation might call for a reservoir for every plant. It depends on the size of your plants and your reservoir.
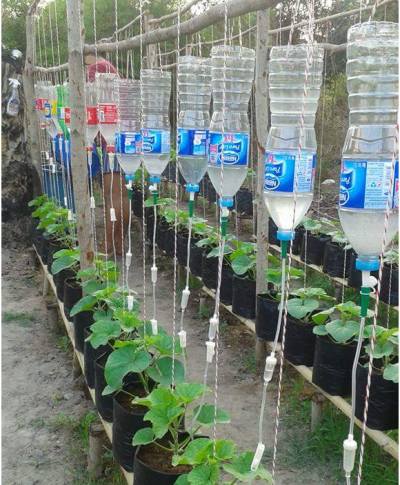
You can buy gravity irrigation kits and systems, but it’s easily turned into a DIY irrigation project. You can use water or soda bottles for individual plants. To water a row or group of plants from one drip irrigation reservoir it’s best done using buckets, totes, or barrels with a tight-fitting lid. You don’t want to lose water to evaporation from the container. It’s also important to stop debris from collecting that can plug up your drip system.
One ancient gravity irrigation system is known as an Olla pot. These clay vessels buried in the middle of a ring of plants drip water through the porous sides whenever the water pressure around it drops too low to hold it in. You can use one alone or create a connected system that automatically refills a chain of them from a reservoir. Garden shops sell the clay versions, but a plastic drink bottle works well too. Drill tiny holes down one or all sides and bury it next to plant roots. Using the cap end for refills works better than cutting off the bottom. Gardeners use them in flower pots, container gardens, and traditional plots. However, you need a larger reservoir for large plants and multiple plants… like a big jug.

Setting up gravity irrigation that delivers water at the surface calls for elevating your reservoir. The simplest setup makes use of 1-2 liter PET bottles with either hole drilled in the cap or purchasing spike emitter caps. Since this leaves your reservoir exposed to sunlight, it’s best to use transparent bottles as a temporary solution while you’re out of town. Because if the sun can penetrate it algae will grow in your reservoir. For long-term use, paint repurposed drink bottles a dark color.

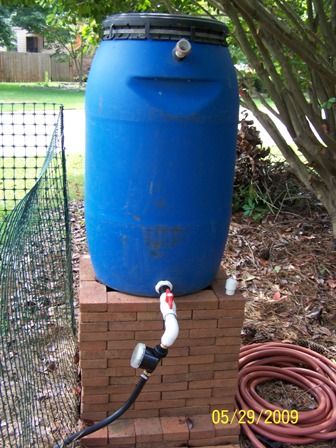
Got an army of containers? A raised bed or backyard garden? Consolidating your DIY irrigation to draw from a larger drip irrigation reservoir might make far more sense. Here you will want to add a hose timer to manage water flow because, with the water reservoir raised off the ground, the flow won’t shut off by pressure in the soil. And you do want it elevated to improve your water pressure unless you only need it to travel short distances.
One urban farming nurse’s solution in a cucumber patch was to incorporate IV drip lines used in hospitals. This would allow some special individual plant treatment and will work in a pinch, but perhaps isn’t suited to all water sources. Hose or tap timers aren’t always expensive and come in manual, solar, and battery-powered models. Just connect it to the spigot tapped into your raised reservoir and attach the main water line feed to the timer outlet.
In such a DIY irrigation system you can connect both weeping drip hose or drip line tubing delivering water down your rows or grid. Using drip line tubing allows you to choose where water is emitted. So, you use water only on your plants, which increases your water conservation. You can also attach spaghetti line and drip emitter caps to increase water delivery to larger root systems. However, drip emitters and spaghetti line can easily clog from debris and particles in pond, stream, and well water. If any of those are your water source, look for drip system parts rated for dirty water.
Gravity irrigation isn’t just for outdoor gardening. In fact, a system like the AutoPot found at indoor gardening shops uses gravity fed sub-irrigation made available to the plants through capillary action. Here a specially designed mechanism controls water flow, triggered only when the growing media is dry. AutoPot Easy2Grow systems work well indoors or out, scales perfectly from 2 pots to 1000s, and requires no electricity. Yet, it delivers professional grower precision.

You will also see people using the pop bottle irrigation reservoir for indoor plants. Some partially or fully bury them next to the plant. Others make use of the drilled or spike emitter cap. And then there’s the primed line drip trick. Filling a jar or jug with water and placing it raised above the plants. Next, create your gravity irrigation via a piece of tubing much like siphoning gas. Suck the water to the end and stick it in the growing media. It will only let water into the container when depleted water pressure allows it to do so. Note that you need small tubing or you’ll have more than a drip action.
There’s an automatic irrigation option that fits anyone’s style of gardening, no matter where on Earth you live. Gravity irrigation can keep plants happy and healthy with a fine-tuned manufactured system, a simple conversion kit, or full-blown DIY irrigation for a big garden or farm that need multiple reservoirs. It’s not always necessary to have fancy stuff to grow well. All your veggies care about is consistent moisture, lots of sunshine, and a balanced diet of quality nutrients 🙂
More info:
- All About Olla Pots & Systems
- Rain Barrel Irrigation Reservoirs
- Gravity Irrigation Drip Kits (clean or dirty water!)
- Water Pressure and Reservoir Capacity
- Drip Irrigation with Emitters
- Soda Bottle Sub-Irrigation: cap fill – or – totally hidden
Images courtesy of NRCS, Acme Sand, Evelots, Bits & Pieces, josem706 (respectively).
[/et_pb_text][/et_pb_column][/et_pb_row][/et_pb_section]