Everest Fernandez explores the trend of adding side lighting to LED indoor gardens.
Side lighting complements top lighting. Additional lighting fixtures emit their light laterally (rather than downwards), so the sides of your plants benefit the most. To fully understand why side lights are finding their niche, we must first understand the limitations of multi-array LED top lights.
Limitations? Don’t get me wrong. Indoor growers prize multi-array LED fixtures for several good reasons:
- full spectrum output
- higher uniformity over the footprint
- incredible photon efficacy
- the ability to dim output without adversely affecting spectral quality.
Sometimes, the diodes are controllable across multiple channels, allowing an adjustable spectrum. Multi-array LED fixtures can also be placed closer to the plant canopy than their legacy counterparts, High-Pressure Sodium (HPS). The light from the diodes on LED fixtures is highly directional, so no reflectors are needed to bounce light toward the plant canopy.
Multi-Array LEDs’ Canopy Shading Effect
Indoor cultivators using multi-array LEDs understand all too well the ‘canopy shading effect.’ Illuminating plants using the composite light produced from thousands of tiny, highly directional diodes positioned a few inches above the canopy results in significant shading. The source light is spread over a large spatial area, so any photon that finds its way through a crack in the canopy isn’t joined by many others (relative to the light’s total output), hence the huge drop-off in measurable PPFD when a PAR meter sensor is held just a few inches below the canopy.
Of course, workarounds and mitigation strategies exist. On the light-manufacturing side, some LED fixture designs condense the photonic output into one or two light bars rather than spreading it across eight or ten light bars, as with multi-array. However, these commercial-style LED fixtures (e.g., Fluence Vypr & Vypr Duo, PHOTOBIO TXR) necessitate a greater distance from the canopy. Some manufacturers try to place them closer by using secondary optics (SANLight EVO) to broaden the fixture’s output.
Is Defoliation Really The Answer?
Meanwhile, indoor growers have adapted their cultivation techniques to suit multi-array LEDs. Some cultivators choose to grow more smaller plants using shorter veg periods (even with smaller plants, heavy pruning is still required early on).
From hobby growers to commercial indoor farmers, it’s now common practice to strip away stems, leaves, and growth tips that languish beneath the light-hogging canopy. However, defoliation is time-consuming and laborious, even in a relatively small indoor garden, and often generates multiple trash bags of discarded foliage. Essentially, all plant matter below the canopy is removed, save the main stems, leaving just bare stems beneath a full canopy—a process sometimes referred to as ‘lollipopping’. Not only is it highly inefficient to send all this foliage to the compost pile, but growers are also removing valuable carbon stores from the plant.
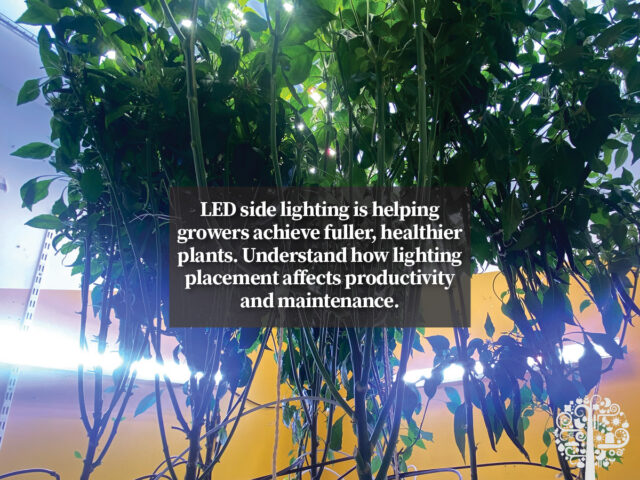
Increasingly, growers are looking to side lighting as a possible solution to canopy shading. The goal is to reduce the reliance on time-consuming defoliation techniques, boost overall production, and increase crop homogeneity. Side lighting solutions come in various forms, from single LED light bars fixed to walls to multi-array, remotely ballasted LED fixtures hung from the sides. In any case, more and more indoor cultivators are supplementing their top lights with side lighting.
So—is side lighting the future or just a fad? And if you decide to jump on board, what side lighting works best?
The Dos of Side Lighting:
- Choose full-spectrum LED light bars that deliver a spectrum close to, or identical to, your top lights to support healthy, robust plant development.
- Avoid ‘Notional’ Side Lights. Many ‘side lighting solutions’ touted online are underpowered and notional. Aim for a minimum of 150W of total LED side lighting power per 1.2 meters of garden ‘side’. Those 22W or 44W LED tubes should stay in your propagation chamber—they won’t have enough oomph for side-lighting applications for flowering plants.
- Proximity is Everything. Position your side lights as close as possible to your plants, ideally between 30 and 50 cm, depending on power. This proximity helps maximize light absorption without overwhelming your plants with excessive heat or intensity.
- Incorporate Early: Switch on side lighting as soon as your plants are tall enough to justify it, typically at the end of veg or the start of transition. This helps plants to acclimate and respond better to the enhanced lighting conditions, promoting balanced growth and mitigating the risk of light burn on leaves and fruits.
- Adjust for Heat and Transpiration: Side lighting can raise room temperatures, which can help if you rely on heaters to keep your room warm enough. Note that your plants will drink more with side lighting, so you must increase irrigation frequency accordingly.
- Ensure Safety and Efficiency: Side lights are arguably more prone to damage, so select robust, IP65 (or higher) rated fixtures to prevent damage and accidents.
- Thermal Management is Key! Light bars should only be fixed to walls when there is sufficient air gap left behind them for proper thermal management (think a minimum of one inch per 100W of power).
The Don’ts of Side Lighting:
- Don’t Skimp on Quality: Avoid settling for underpowered or poorly constructed LED solutions. Quality ensures adequate side lighting without the risk of system failures or inadequate light coverage.
- Don’t Overlook Installation Angles: Incorrect positioning can lead to uneven growth or burnt foliage. Ensure your lights are evenly spaced and angled correctly to cover the intended area without direct hotspots on the plants. I position my side lights perpendicular to the top light.
- Don’t Miss Plant Response: Watch for signs of light stress, scorched leaves, or wilting. If your plants show adverse reactions, adjust the light intensity, distance, or duration. If your plants’ leaves turn dark green, increase irrigation frequency or lower nutrient solution conductivity slightly.
- Don’t Forget to Dim: Use dimmable LED fixtures to gradually increase light intensity, especially if, counter to my advice, you’re introducing side lighting to more mature plants. This prevents shock and allows for a smooth transition to new light conditions.
- Don’t Neglect Regular Maintenance: Clean and inspect your LED fixtures regularly to maintain optimal performance. Dust and debris can reduce efficiency.
- Don’t Underestimate Light Penetration and Defoliation Needs: Remember that different plant species have unique lighting requirements. Plants will often produce an abundance of side foliage in response to additional side light. If you are growing species that produce photosensitive flowers (those which benefit from direct light), you may still need to tactically remove foliage to increase penetration from side lights.
- Be Careful using Side Lighting in Grow Tents: While some grow tent manufacturers have started offering (typically underpowered) clip-on light bars as accessories, they invariably don’t pack enough punch for the intended application. Powerful LED light bars build up heat, especially at the back of the light bar. Avoid contact between the light bar and the grow tent material. Remember, thermal management is critical to preserving your diodes’ lifespan.
Embracing side lighting can significantly enhance your indoor garden’s productivity and crop homogeneity. You will notice that the qualitative difference between flowers and fruits at the top and bottom of the plant is markedly reduced. Sure, the top is always the top, but side lighting can give you more marketable produce—around 20% to 50%—and reduce your labor overheads. What’s not to love about that?
Some Recommendations when Installing Side Lighting Fixtures
As a general rule of thumb, allocate 100W of side lighting power per 45 cm (18 “) x 120 cm (4′) of ‘side’. So, if you’re growing plants that are 90 cm (36”) high, you should consider 2 x 100W light bars (arranged in an ‘equals sign’ formation).
Incidentally, the most side-lighting power I’ve experienced came from ‘repurposed’ 660W twin bar fixtures (330W each light bar) with wide 140-degree optics. These worked best when dimmed down to around 50 to 60% power.
Want to Dig Deeper into the Science of Side Lighting?
Side lighting has been found to significantly enhance plant growth, improve the internal structure and arrangement of chloroplasts in leaves, induce smaller stomata with higher density, promote stomatal opening, and improve photosynthetic efficiency, leading to enhanced branching and flowering in plants such as chrysanthemum. (Yang & Jeong, 2021).
Lighting from both the top and side can enhance photosynthesis and plant performance by improving light usage efficiency. This results in better branch formation and earlier flowering, suggesting that the optimal combination of various lighting directions can positively influence plant morphophysiology. (Yang, Song, & Jeong, 2022).
Polychromatic supplemental lighting under the canopy can enhance tomato plant development by improving leaf photosynthesis and stomatal regulation, showing that proper light orientation and spectrum can significantly affect plant growth and development. (Song, Jiang, & Gao, 2016).