fbpx

Tips For Balancing Your Soil’s pH

Soil pH (or hydrogen ion concentration) indicates how acid or alkaline our soil or growing medium is. It is measured in pH units to show on a scale of 0 to 14 whether the soil is neutral, acidic or alkaline. Soils with a pH value of 6.5 to 7.5 are considered neutral. Over 7.5 indicates an alkaline soil pH, whereas below 6.5 is acidic.

Why Testing Your Soil pH Is Important

Soil pH directly affects the availability and uptake of nutrients and chemicals soluble in soil water by plant roots. The further from neutral the soil pH is, the less total nutrient uptake occurs, leading to nutrient deficiencies. However, the maximum mineral nutrient availability occurs between pH 6.5-7.5.

In Australia, our native soils vary widely. Coastal lime soils tend to be alkaline. Volcanic acid soils, compacted poor quality ‘fill’ soil in urban new housing areas, and those with higher organic matter, like compost, influence soil pH. Other factors that impact pH include soil type (sandy, clay or loam), temperature and high rainfall. Commercial blends of potting soils are pH tested, so consumers are confident they are getting a reasonably balanced input.

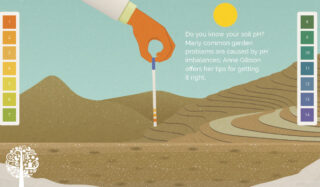
Many common garden problems are due to soil pH imbalances, so it’s vital to test, monitor and adjust the soil to maintain it within the optimal range. This also applies to working with a potting or seed-raising mix.

PH meter resting in soil in a canvas plant pot.

I recently worked with a client who amended her potting medium with several ingredients, including coir peat, compost and vermiculite. She had poor seed germination and seedling failures. When testing the pH of the mix, we found it to be highly alkaline at 8.5. I suggested she test the individual inputs to see where the problem lay, and surprisingly, the compost supplier was the culprit! It was a good lesson in testing every batch and understanding the imbalances and negative consequences.

Soil pH Impacts Nutrients, Minerals and Growth

Plants obtain 14 of the 17 essential nutrients in a dissolved form in soil water. Highly acidic soils (pH 4.0-5.0) can contain toxic concentrations of minerals like aluminum, manganese and iron that can affect plant growth.

Beneficial soil bacteria that perform a vital role in decomposing organic materials are hampered in highly acidic soils. This impacts the breakdown and availability of nutrients, especially nitrogen. Essential minerals become ‘locked up’. So, a balanced pH is a key to plant and soil health, including the biology.

Tips for Taking a Soil Test using a Kit

PH meter being placed into soil with a hand to test the soil ph.

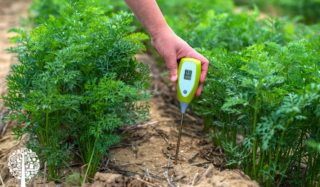
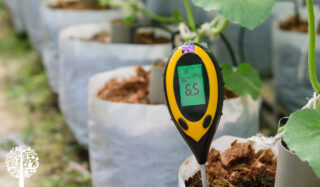
An accurate method of determining the soil pH is by using a pH meter. This is simply inserted into the soil, and a reading is taken. Another easy method uses special indicators or dyes that are matched against a color chart. The steps are quite simple:

  • You may need to test multiple soil samples individually for the best results if you have many garden beds and pots.
  • I test each zone and batch of the potting mix to know if there are any pH issues I need to address.
  • If you want an average pH of your garden soil, you can take multiple samples and combine them for testing. However, you may risk missing an issue in one area that could need remediation to correct a strongly acidic or alkaline soil.
  • If you are collecting soil from a sizeable in-ground garden bed, dig a hole down to 10 cm from the surface. Take at least five labeled samples from different parts of the bed. Test each separately; this will provide you with data to compare. If all samples are pretty close in pH values, you can make any soil amendments to the entire area. If one or more of the samples are significantly different, you can treat them individually.
  • Remove any fibrous organic materials or stones by hand or sieve before testing.
  • When testing potting mix – either homemade or commercial – thoroughly mix the blend before taking an average sample. I’ve found results vary considerably by missing this step!
  • For small potted plants, remove the plant from the pot. Take a sample of the potting mix immediately around the rootball.
  • For potting mix in large tubs where you can’t remove the plant, take a sample as deep as possible around the rootball. Use a sharp trowel to dig down along the inside wall of the tub to collect the sample and blend it thoroughly before testing.

Kit directions are easy to follow:

  • Add a flat teaspoon of the soil or potting mix sample to the test plate surface.
  • Squeeze a few drops of the purple dye indicator liquid onto it and mix well into a thick paste.
  • Dust the white powder over the paste and wait about one minute for the color to change.
  • Use the color card with pH values from acidic to alkaline to match as closely as possible to your sample. Compare the soil sample in natural light for an accurate color match.

I record my pH tests in a Garden Journal. This provides accurate data to work with if any amendments need to be added to adjust soil pH. Keeping a record is so valuable. You can look back to compare the pH and any improvements over time. An annual soil test will reveal any action you may need to take. If it’s within your budget, start with a professional soil test. Lab results provide you with exact inputs to correct the pH and avoid any potential nutrient deficiencies.

If the soil is too acidic: less than 6.5 = low pH (most common for Australian soils):

  • The quickest solution is to add high-quality organic matter in the form of compost with a neutral pH, so you can start planting ASAP. Adding humus (broken down compost) is the best way of changing pH naturally. Let the soil biology do the work!
  • Acidic soils tend to attract fungi and may be fungally dominant.
  • Make a ‘compost tea’ with a handful of compost in an old sock or stocking dangled over a bucket. You can add a small lid of liquid seaweed, fish emulsion, worm leachate from a worm farm and a tablespoon of molasses to help feed beneficial microbes. Ideally, use a pump to aerate the compost tea for 12-18 hours and use immediately. Dilute and water in or spray over your soil and plants.

You can also plant into ‘pockets’ of compost or potting mix while you remediate a larger area of the garden. Simply dig a hole bigger and deeper than the plant you want to grow, and fill this with your compost or potting mix. This strategy will enable you to keep growing while improving the soil in your garden. As the plant establishes, its roots will use the balanced nutrients and moisture in the potting mix or compost so it won’t suffer while you work on the surrounding soil.

If you are not getting a professional soil test done, it may be appropriate to add agricultural lime, not builder’s lime, to raise the pH if it’s too acidic. As a guide, carefully apply 100g/meter. The most accurate way to apply lime is after a professional soil test analysis, which will show you which minerals are deficient or in surplus. Again, it will take a while to increase the pH when you amend the soil using lime. You could expect to see a change in the pH within six months.

If soil is too alkaline: greater than 7.5 = high pH:

  • This soil will be harder to rebalance than acidic soil (<6.5) and likely contain more bacteria than fungi.
  • The quickest solution is to add high-quality organic matter in the form of compost with a neutral pH so you can start planting ASAP. Adding humus (broken down compost) is the best way of changing pH. Again, let soil biology do the work!
  • You can also plant into ‘pockets’ of compost or potting mix while you remediate a larger area of the garden.
  • Add green manure crops every season to improve soil health, organic matter content and increase microbial activity.
  • In an extreme situation, you could use powdered sulfur. However, this option has pros and cons! Be careful, as sulphur is anti-microbial and can kill off your biology if applied regularly. You could take the approach of making an initial application by using one handful/square meter and again annually after testing if still needed. Unfortunately, adding sulfur to the soil is a slow method of adjusting the pH and is affected by moisture and soil life. In highly alkaline soil, it’s likely you would not notice a change in the soil pH for about six months.

When a plant expends energy adjusting the pH inside its cells and outside in the soil, its overall growth suffers. This is why we sometimes have to step in to adjust the pH to create a more balanced environment for our plants to grow. But ultimately, plants are in control! As Jeff Lowenfels, author of ‘Teaming with Microbes’ explains, “Plants synthesize and release exudates of various components that adjust the pH to where it should be.” Now and then, though, we can give them a helping hand for a healthier, thriving garden.

Graphic showing the cover of 'TEAMING WITH MICROBES', an informative book about testing your soil ph.

The basic rules are to add compost, mulch and apply compost teas. These steps will help improve your soil pH, increase soil biology (fungi, bacteria and worms) and create a buffer for both acidic and alkaline soil types.

Leave a Comment

Your email address will not be published. Required fields are marked *

Author

Anne Gibson

Speaker, author and urban garden community educator.

Anne Gibson, The Micro Gardener, is a speaker, author and urban garden community educator on the Sunshine Coast, in Queensland, Australia. Anne is passionate about inspiring people to improve health and wellbeing, by growing nutrient-dense food gardens in creative containers and small spaces. Anne regularly presents workshops, speaks at sustainable living events, coaches private clients and teaches community education classes about organic gardening and ways to live sustainably. She has authored several eBooks and gardening guides. Anne shares organic gardening tips and tutorials to save time, money and energy on her popular website.