I am currently trying to purge my life of plastic. It was discouraging to see all the plastic containers and trays I use to start my seeds indoors to get a head start on the growing season. I began looking for plastic alternatives and stumbled upon soil blocks. All you need is a tray of some sort, potting soil, and, like all seed-starting, patience!
What are soil blocks?
Soil blocks are pretty straightforward – all you do is mix your potting soil and compress it into square or round shapes using a soil blocker. Then, plant your seeds and watch them sprout.
Benefits
Other than no plastic, soil blocking offers plenty of perks. The soil isn’t packed tightly into a container, and more airflow allows the seedlings to absorb more nutrients. The result is a healthier and stronger plant. When it comes time to transplant, just pull the soil blocks apart and plant the seedling with the soil block directly into the ground. This prevents any root damage or shock to the tender seedling.
DIY Soil Blocks
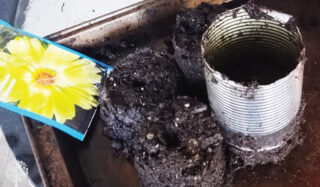
You can buy soil blockers from garden centers or online. You can also make your own using an old soup or tuna can with both ends cut off. File the tops down so the cans aren’t too sharp. I used some cans and my bulb-planting tool, too.
The Soil
Soil is the most crucial part when it comes to soil blocking. It needs to be moist enough to hold its shape yet not too moist that it will rot the seeds. There are many recipes, but the one below is my favorite because it’s easy.
In a large tub, mix three parts of peat moss or coir, two parts garden soil, two parts perlite or sand, and one part organic compost. Stir in enough water so that the mixture has the consistency of wet cement.

How to use a soil block
After mixing the potting soil, place the soil blocker over top of the mixture and press down. Transfer the soil to a tray or holding container and press the handle of the blocker to release the plugs. I used a glass the same size as the plug to release the soil onto an old cookie sheet for my homemade ones.
For good seed germination, soil blocks should be 4-6” in diameter and depth. The smaller the seed, the smaller the soil plug. For tiny seeds that need more warmth to germinate, such as tomato seeds, for example, 4” plugs will hold in the warmth of the soil better than 6” plugs. Larger plugs are perfect for seeds like sunflowers or sweet peas.
Sowing and growing the seeds
Once you’ve created all the soil blocks you need, place the seed in the center of a small divot created by the soil block maker. For homemade soil blockers using cans, make a hole with a pencil. The depth of the divot should equal the depth for sowing recommended on the seed package.

Press the seed gently into the soil, but don’t cover it with the moist soil. As long as it’s made good contact with the soil, it will germinate. Place the plugs in a warm and dry location or under a grow light, but don’t cover them with a humidity dome. The heat generated by the soil and the moisture it contains are all the seeds need to germinate.
When the seedlings are ready, transplant them outdoors with the soil block. Soil blocking may be a little more time-consuming than other methods, but the plants are healthy, and I’d like to think happier without being grown in plastic. This is an incredible waste-free way to start some seeds indoors!