Saving seeds starts with growing and nurturing healthy plants, so the seeds are ripe and mature. The next steps are to harvest, dry, clean, and process the seeds, ready for storage until you’re ready to plant.
Harvesting Guidelines
- Collect seeds only from the best quality plants you have identified for saving. Stop picking leaves or flowers from these plants. You’re growing them for seed only.
- Cover seed heads with organza, paper bags, or old stockings. Tie tightly to the stalk with string, so seeds are protected from wind and predators.
- Identify each seed variety with plant labels as you collect and change containers. Many seeds look similar, and it’s easy to forget or get confused.
- Seeds must be fully ripe before collection. This involves cutting off seed heads or the whole plant when nearly ripe and drying undercover or leaving to thoroughly dry on the plant before harvesting.
- Seeds harvested before their prime will often grow if you plant them right away. However, those seeds with the maximum time to store more nutrients last longest in storage.
- Harvest seeds or fruit containing seeds around 10 a.m., after the dew has evaporated when they are driest.
- Those seed heads that need drying before the seed extraction treatment should be thoroughly dried after collection to prevent mold or premature germination.
Timing Your Seed Harvesting
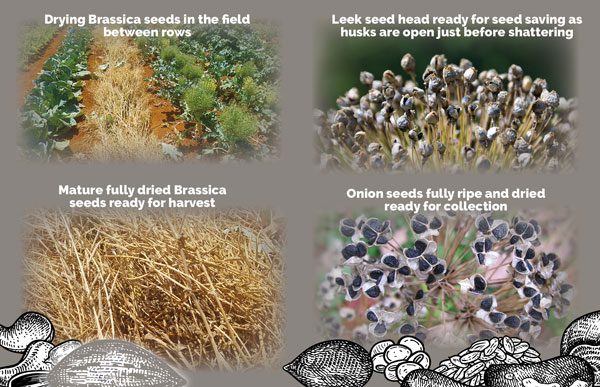
This is a balancing act. You want the seeds as mature as possible, so they are fully developed. However, you may decide to harvest earlier due to wet weather, hungry animals, or losing seed if mature seed pods shatter or the wind blows airborne seed heads away. It’s common to harvest some dry seed heads before all their seed is sufficiently dry and mature. These will need extra time to ‘cure’ before they are ready for processing.
Rain or overhead watering may also damage seed quality after seeds start to dry on the plant. You may need to wait until seed heads have dried thoroughly after rain. However, there is a risk they may over-ripen by this time.
The seed must be dry and hard enough to withstand processing, and the plant material it’s attached to must be brittle enough to shatter and break away from the seed easily. You need to observe what stage your plants are at to get your timing right as best you can.
If you can’t manage multiple seed harvests, strike a balance between waiting for later maturing seed to ripen and picking earlier maturing seed before too much falls off the plant or becomes too brittle, shattering at harvest. As a general guide, collect when 60-80% of your seeds are ripe.
All vegetable and herb crops have their unique clues as to when the fruit or seeds are ready to harvest. There are both ‘dry seeded’ and ‘wet seeded’ crops. It takes a little practice and experience to identify the traits of each plant so you can get your timing right for harvesting, but there are some basic guidelines.
Materials List for Seed Saving
- Sharp secateurs for collecting seed.
- Buckets, trays, and containers for collecting and winnowing.
- Tarps or geotextile drop cloths for drying seed heads, catching seed, or winnowing onto.
- Sieves or fine mesh strainers of different sizes to separate the chaff and drain water from wet seeds.
- Pastry brush, rolling pin, and cloth bags for seed cleaning.
- Box fan if there is no consistent wind for winnowing.
- Jars or small containers for fermenting and processing wet seed.
- Paper bags and string, trays, plates, or glass for drying seed.
- Marker pens and labels to record seed varieties when collecting and processing.
Dry Seeded Crops
These are crops where the seeds are contained in dried pods, husks, or the seed-bearing portion of the plant. Some seeds can be harvested before they are entirely brown and dry if weather conditions, birds, insects, or rodents are likely to damage them (e.g. Beans, peas, basil, broccoli, lettuce, onions, corn, okra, turnips, and sunflowers).
However, plants in the mustard (Brassicaceae or Cruciferae) family won’t continue ripening after harvesting. So ideally, leave these seeds on the plant until fully mature and dry if possible (e.g. broccoli, kale, and cabbage).
Finally, plants with seedpods that shatter, like lettuce and members of the onion and carrot families need to be picked progressively as they ripen, especially in windy or wet weather, which can ruin or distribute the seeds (e.g. spring onions, chives, parsley, and dill). Dry processing techniques are used to extract the seeds from all ‘dry seeded’ crops.
How do you know if dry seeded crops are ready for harvest? Indications include:
- Colour of the seed pod/capsules, or seeds. As seeds mature and ripen, the color may change from white or green to yellow, light brown, or darken to shades of brown or black.
- How dry the pod or seed feels. Open to check if there is still some ‘give’ in the seed pod or whether it is crispy and dry. If you wait too long, the pods may shatter and release the seeds before you harvest.
- How easily the seed or seedpod is removed from the stalk. If you rub the seed head vigorously with crops like beets, coriander, and Swiss chard, the seed should come away effortlessly when ready.
Seeds may ripen and mature unevenly within the pods, so you may need to individually harvest each plant when the timing is right. As your plants near harvesting, it’s best to check daily. Lettuce and dill are examples of plants where seeds mature at different times on the same plant. You can pull up the whole plant and hang bags tied on the seed heads upside down to allow them to dry and fully mature without losing seeds.
Wet Seeded Crops
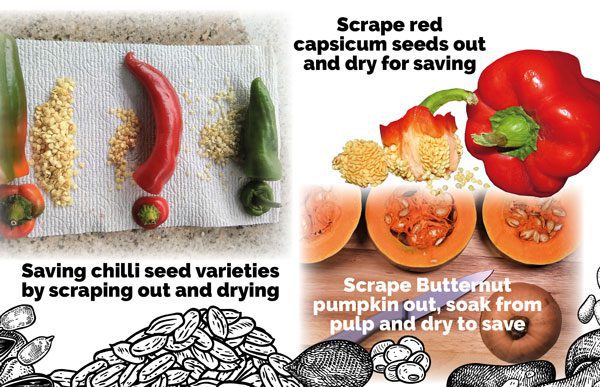
These seeds mature inside fleshy fruit and are from the Solanaceae plant family (including tomatoes, capsicums, chilies, and eggplants) and the Cucurbitaceae family (including melons, squashes, and cucumbers). A variety of wet seed processing techniques can be used to remove and dry these seeds. Again, there are clues to help you identify when to pick your fruit to extract the mature seeds.
- Fruiting crops that contain seeds inside their pulp, like tomatoes and eggplant, are best picked when the fruit is over-ripe, turning soft and just past being edible.
- Cucumber, zucchini, okra, and sweetcorn are often picked young to eat but need to reach full mature size and then be left on the plant for another three weeks before seeds will be fully developed.
- Pumpkin and capsicum are harvested when they are ready for eating and fully mature. The seeds for these crops are scraped out of the cavity inside after picking.
- Generally, after the fruit first becomes edible, the seeds will continue increasing in size and quality for several days, weeks, or even 2-3 months for pumpkin and squash varieties. Full seed maturity increases the germination rate. It’s sometimes necessary to pick the fruit to protect against disease or damage and allow it to ripen in storage before processing seeds.
Collecting dry seeds
This is easy and fun. For small scale seed collection, use scissors or secateurs to snip seed heads off each plant. Alternatively, cut the whole plant off at ground level and hang upside down to dry or collect seeds in a bag tied over it. Keep only the part of the plant with the seed head needed for seed saving. Calico bags, paper bags, and buckets are useful for collection along with a string for tying bags or bunches for drying.
Geotextile fabric drop cloths can also be laid in rows, layering bulk plants on top, making it easier to collect seed in the field. Face the top of the plant towards the center with roots outside the outer edge of the fabric. This makes seed catching effective while avoiding soil contamination from the roots. Geofabric material allows water from rain or dew to pass through, wicking moisture away from the plant material. Plants should be turned repeatedly for even drying in the pile.
Processing seeds for saving
A table in a dry, protected undercover environment away from wind and high humidity is ideal to use as a working area. Hang any immature seeds in bags undercover where they are safe from rodents and can continue to mature and ripen before processing. Small quantities of seeds can be spread on a plate in a cool, shaded, and well-ventilated spot to dry out. Mature seed heads with dried seeds can be processed immediately. Fruit containing seeds will need to be processed separately.
Seed cleaning techniques are dependent on whether the fruits and seeds are ‘dry’ or ‘wet’ when mature.
How to Process Dry Seeds
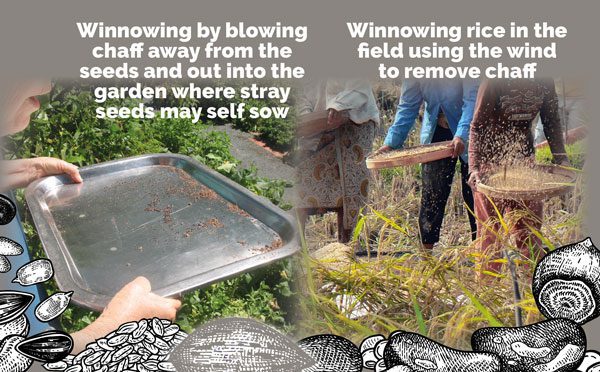
Seed cleaning methods. When your plant seed heads are dry enough, the seeds must be separated from the non-seed material they’re mixed with. This may include pods or husks (known as ‘chaff’), leaves, stems, soil, stones, insects, and weed seeds. It’s quite common for small insects to feed on seeds while they are drying. The aim is to achieve ‘clean seed’ with no chaff ready for packaging and long term storage. Some seeds are quick and easy to clean, while others take some work!
Cleaning is accomplished using one or more techniques depending on the seed type:
‘Winnowing’ separates seeds from plant material based on weight. This entails blowing air to disperse the heavier seeds as they fall from the lighter chaff. One method is to lay small quantities of seed material on a shallow tray then carefully blow the chaff away with your breath. Ideally, do this over a tablecloth or newspaper to catch any seeds blown out and then hand-clean. To winnow larger quantities, slowly drop the seed and chaff mixture from a few feet above a bucket or onto a tarp in front of a fan or cool hair dryer on low speed. Seeds should fall into the bucket while chaff blows away. A gentle wind can also achieve the same effect.
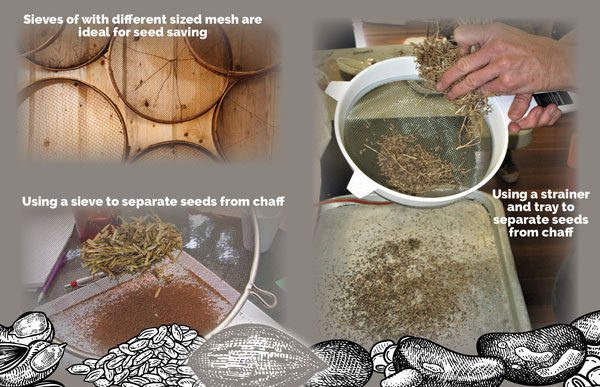
- ‘Screening’ using sieves, strainers, or screens of different sizes over a tray or plate helps separate seeds based on size. Seeds fall through to the tray while the chaff is collected on the screen or sieve above. Use two screens – one with mesh just smaller than the seeds and the other a little larger. Shake and rub the seed over the first screen to filter any plant material smaller than the seeds, allowing it to fall through. The second screen lets the seeds through but prevents anything bigger. This may need to be repeated to achieve clean seed with no chaff. A pastry brush is also useful for quickly removing fine chaff and insects from trays.
- ‘Threshing’ isolates larger seeds by releasing them from pods or plant material. Seeds are added to a sealed calico or plastic bag. Then, techniques like using a rolling pin, stomping with flat-soled shoes, hand rubbing, or whacking separates the seeds into the bag. Quite a therapeutic way to relieve stress! The separated seeds and chaff are then screened or winnowed for final cleaning.
How to Process Wet Seeds
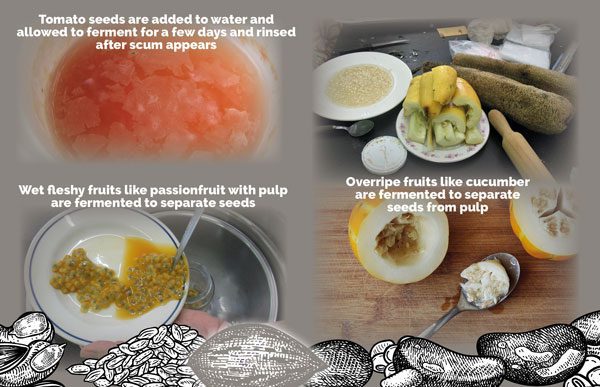
Seed cleaning methods. Wet seeds need to be separated from the surrounding pulp or flesh, then washed and dried. For most seeds, this is pretty straight forward and involves scraping them out, rinsing, and drying. Other techniques may be required.
- Fermenting tomato and cucumber seeds imitate the natural ripening cycle and process of fermentation that happens when these ripe fruits fall and rot or are eaten by animals. Fermentation is necessary to clean tomato seeds and remove the germination-inhibiting gel encapsulating each seed. Squash family and eggplant seeds may also benefit as fermenting can kill molds, mildews, and other diseases that may be present, but it’s not necessary.
To ferment, scoop wet seeds and any pulp into a jar and cover with hot water. Shake or stir well several times a day. Wait one or more days until the seeds start to drop to the bottom of the jar and become separated from the flesh. You may notice bubbling, scum, or mold on the surface of the water. After a day or so, remove a few seeds to see if the pulpy coating has been separated. Rinse to test. If the seed is clean, you can rinse the whole batch in a sieve and dry on a plate. Don’t leave the seeds fermenting any longer than necessary to clean the seed or they may germinate. If seeds start sprouting, they have fermented too long.
- Soaking helps make seed cleaning easier by loosening any pulpy residue clinging to the seed (e.g. pumpkin and melons). Place seeds and pulp in a container full of water and soak no longer than 8-12 hours to prevent germination. Rinse and dry.
- Decanting separates pulp and quality heavy seed from lightweight, less viable seed. First, rinse or crush the pulpy seed mixture to break up large, lumpy material. Add seeds and pulp to a container or large jar with at least ten times the volume of the pulp mixture. Add 4 parts water to 1 part pulp mixture. Shake well and stir until pulp separates. Allow the viable heavy seed to settle on the bottom. Pour off the top layer of floating pulp and less viable seeds. Repeat this process until the water is clear, and heavy seed goes to the bottom.
- Rinsing cleans the seed ready for drying and involves a colander, strainer or screen, pressurized water, and rubbing with your hands. Add wet seeds to a strainer. Under running water, rub away the pulp with your fingers while spraying the water to ease the pulp out of the strainer or colander. Strain it off until the seeds are cleaned and no pulp remains. Alternatively, rinsing over screens allows the seeds to fall through to a bowl while keeping the pulp on top.
- Drying. The seeds need to be extremely dry before storing. After cleaning, drain seeds fully in a strainer. Absorb any additional moisture by patting the base of the strainer with a paper towel. Next, spread seeds over any shiny surface (e.g. a tray, ceramic plate, or sheet of glass). Seeds stick to any kind of paper. Leave in a cool, shady, dry location for several days or longer as needed. Once fully dry, the seeds should slide easily off the shiny surface, ready for testing and storage.
Final Drying
All seeds should be dried as quickly as possible by optimizing airflow. Air conditioning, a food dehydrator set below 95°F (35°C), or a fan on low speed may assist. On a flat, non-stick surface such as glass, plastic tray, ceramic plate or wood, spread seeds out in a thin layer. Avoid materials that seeds stick to like paper towels or cardboard. Rotate seeds as necessary to encourage drying. Seeds will be compromised in temperatures >95°F (35°C).
Testing to see if Seeds are Sufficiently Dry
- Bend or Hammer Test: Try bending thin seeds like pumpkin or small, oblong seeds like lettuce. If they snap instead of bending, they are ‘very dry’. For large seeds (e.g. peas, beans or corn), place on a solid surface and hit with a hammer. They should shatter if they are ‘very dry’. If not dry enough, they will smash or mush instead.
- Paper Test: Add a piece of dry paper inside your container overnight and keep a control piece away from the seeds. The next morning, compare both to decide if the paper is still crisp or soft from moisture in the seeds.
- Al dente Test: When you bite a seed, it should feel very hard. It needs more drying time if you can make tooth marks on it.
Once your seeds are dried, they are ready for long-term storage.