I’m typically a sucker for gadgets and technology—a marketeer’s dream. Despite this, I must concede that I find even the sight of automatic nutrient dosing machines to be somewhat intimidating. All those tangled tubes going in and out of nutrient bottles and reservoirs, the peristaltic pumps, the elaborate displays, worrisome warning alarms, downloadable apps, and the price of the units themselves. It’s all conspired to keep me in the familiar world of manual dosing for far too long.
If you have more than a few grow lights, mixing up batches of hydroponic feed solution by hand, even if using standard store-bought A and B stock solutions, takes time. And all that time adds up. You’ve also got to keep your meters calibrated, remember to perform periodic reservoir change-outs, and let’s not forget, observe and take care of your plants!
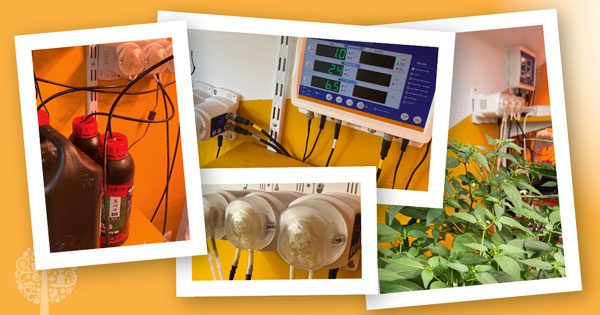
About 18 months ago, I took the plunge with Bluelab’s Pro Controller. Life was so busy that something had to change. And, short of training and keeping a diligent garden-hobbit creature in my basement to mix the nutrients for me, deferring some tasks to an automatic doser was my only option. The Pro Controller is a brain box, and you also need to invest in pumping units known as “Peripods”. I chose two M3 Peripods (three pumps). Along with the Pro Controller brain, this will set you back around $2,400—no small investment!
What Does An Automatic Nutrient Doser Do?
There are two main approaches to automating the process of adding stock solution (concentrated mineral nutrients) to water. The first is the inline fertigation (when the nutrient concentrate is added to the irrigation water as it flows to the plants). The second is making up batches of feed solution in large reservoirs (the method I chose).
The doser has a “brain box” with conductivity and pH meters dangled into the nutrient reservoir. Set your target TDS and pH, and the doser takes care of the rest. It uses peristaltic pumps to suck nutrient concentrate from each bottle in your regime (e.g. Silicon, Cal/Mag, Grow A, Grow B, etc.) and drip it into your reservoir. A circulating pump does the job of stirring it in. The doser then retests the conductivity, repeating the dosing cycle if required. The pH of your nutrient solution is also periodically checked, and pH adjuster liquid is dosed if needed.
Inviting an automatic doser into my life wasn’t me trying to permit myself to take my eye off the ball. It was more about freeing up headspace and giving myself a platform of consistency. More accurate, consistent, and repeat-able nutrient management means I can focus on specific variables and tweak them if necessary. My plants seemed to enjoy a boost in productivity as a direct result of my nutrient solution always being in perfect balance.
But still—the move from the “old world” of manual nutrient mixing and maintenance to the “brave new world” of letting an automatic doser do it for me was a big deal. There are some critical ideas and concepts to learn, and others you need to unlearn. So, I’d like to share my experiences and hopefully get you on the fast-track if you’re planning to make the upgrade.
Bluelab’s Pro Controller is the “brain” of the system. It controls the Peripod pumps which do the physical work of actually pumping nutrient concentrate from the bottles into the reservoir. You can connect up the three Peripods, so if you use the 4-pump Peripods rather than the 3-pump units, you can dose from up to 12 different bottles. With the M3s, I can dose from up to nine. The system also comes with pH and EC probes which connect to the Pro Controller and are placed in the reservoir. Position your nutrient doser and pumps near your reservoir! Note that you’ll need an electrical outlet for the Pro Controller and another for each Peripod.
The Transition from Manual Mixing to Automatic Dosing
Chances are, you’re already saving yourself a bunch of time by using bottles of liquid concentrated hydroponic nutrients rather than mixing up your own with individual salts and a trace element pack. Most of us go for the bottles—although powders are increasing in popularity.
To understand the nitty-gritty of the transition to automatic dosing, let’s run through an example—a basic hydroponic nutrient regime. Say I want to make up a nutrient solution to drive early vegetative growth. My target for total dissolved solids is 600 PPM—that’s an EC of 1.2 milisiemens, and my target pH is 6.0. Let’s also assume I’m using a potassium silicate supplement, a calcium/magnesium supplement, as well as a two-part base nutrient, and a pH adjuster liquid.
In a manual mixing world, our task list might look something like this:
- Fill the reservoir with water—note volume. Let’s say it’s 100 liters or 26 gallons.
- Add 0.5 mil per liter of silicon supplement. So that’s 50 mils. Shake the bottle, measure, pour, and stir in thoroughly. Wash out measuring container.
- Add my cal-mag at 1 ml per liter. So that’s 100 mils to add. Shake, measure—pour—stir again. Wash.
- Base nutrients. 2 ml per liter of each of Grow A and Grow B. That’s 200 mils of Grow A. Pour it in and stir then wash. Then the same for Grow B: 200 mls. Pour that in, mix and rewash the measuring container.
- Check the EC—or the TDS with a conductivity meter. And—if you’re super talented—you’ll hit your target—600 parts per million—or 1.2 milisiemens. But you’ll likely have to fiddle around a bit. You know the drill—if it’s too high—dilute it down. If it’s too low, make up the difference by adding more base nutrients.
- Check pH. If it’s 6.0, shout for joy! If not, you’ll be adding diluted pH down, drop by drop, stirring all the time, until it reaches 6.0—hoping it doesn’t freakishly drop from 6.1 down to 3.8 on that final drop. It happens… and I’m glad I’m not the only one.
Assuming the nutrient solution temperature is where we need it—typically 66°F to 72°F —we’re good to go. Note how I dutifully added my undiluted potassium silicate first—and then my undiluted cal-mag—and then my base nutrients—and then my diluted pH adjuster. In this manual mixing world, the order in which we add the different components is vital to minimize the risk of precipitation. Adding potassium silicate at the end of the mixing process instead of right at the beginning means much less silicon would be likely to stay in the solution due to potassium silicate’s high alkalinity.
How do you teach a machine to do all this for you? How do you instruct it to add the various parts in order? The answer is: you don’t.
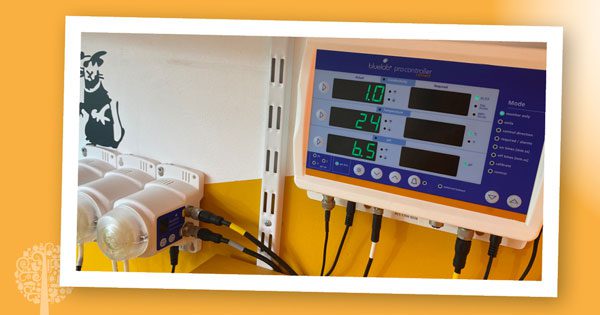
First, I set my target EC to 1.2 milisiemens—that’s 600 PPM—either directly on the Pro Controller brain box itself, or via a laptop computer running Bluelab’s free Connect software.
Next, I had to decide on the nutrient dosing “on time”. This refers to how long the doser will pump nutrients during each dosing cycle. This doesn’t take long to dial in, but there is inevitably some tweaking. The critical point is not to dose too much on each dosing cycle. Ideally, you want your EC to go up by no more than 0.1 milisiemens—that’s 50 PPM—each time the nutrient pumps activate—and no more up or down than 0.1 pH each time the pH adjuster pump starts. Any more and you risk overshooting your target. As for PUMP OFF times, try about ten minutes. This should give even a small recirculation pump enough time to mix in each dose homogenously. It’s essential to allow adequate time for proper mixing in between doses so, if in doubt, go long.
Find a starting point for the M3s and M4s by taking the number of liters in your reservoir and dividing by 20. So, for my 100L reservoir, that’s 5 seconds.
The off-time is how long the doser waits before rechecking the EC and deciding whether another dose is required. Try something between 7 and 10 minutes, more than enough time for my small circulation pump in the reservoir to mix everything up homogenously.
No More Stirring!
Place a small pump into your reservoir, ideally attached to the side of the tank in the lower half to circulate the nutrient solution and aid mixing. I prefer for my circulation pumps to be on 24/7 so a small pump is preferable, as larger pumps can overheat the nutrient solution if they’re always running. Alternatively, you can connect your pump to a cycle timer, but then you risk the doser starting a dosing cycle when the circulation pump isn’t running.
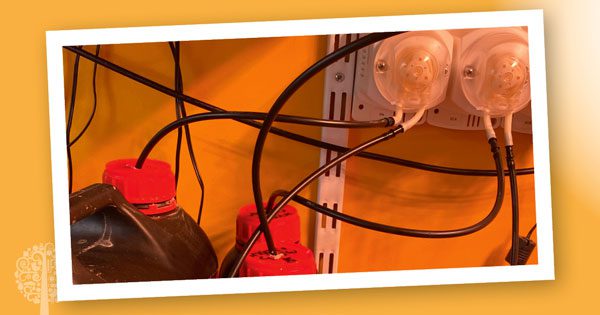
Drill a small hole through the cap of each bottle, wide enough to pass through one of these 1/8 inch tubes. Note that opaque, anti-corrosion tubing is supplied with the Peripods for the pH adjuster dosing. If you’re using highly acidic one-part liquid nutrient formulas, use this tubing for the nutrient dosing. (Both types of tubing are supplied as standard with the Peripods.)
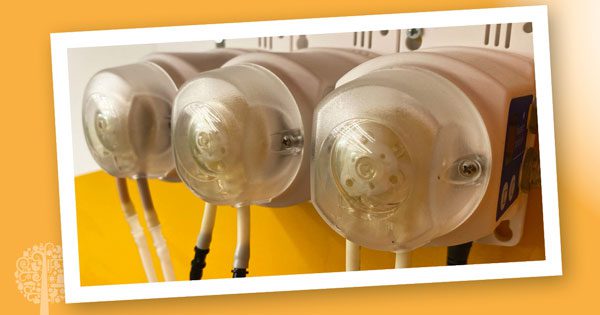
Each peristaltic pump corresponds to a bottle. The left tube sucks the liquid up out of the bottle, and the right tube carries it to the reservoir.
Each pump on the Peripod unit has two tubes—one needs to be fed into each nutrient bottle—the other should be attached to the reservoir. All your nutrients will be dosed simultaneously. Grow A should not be dosed adjacently to Grow B. Secure the dosing tubes so they’re as far from each other as possible. Make sure the tubes aren’t submerged to mitigate any risk of siphoning. Because the amount being dosed during each cycle in so small, you don’t have the same precipitation concerns as you would manually adding 200 ml of each part at a time.
The High Alarm
If my nutrient solution goes above 1.6 milisiemens, call Houston, we have a problem—because I set a target of 1.2. If this happens, it goes into lock-out mode, stops dosing, and an alarm shows. I can receive alerts on my smartphone because I have the Bluelab Connect app downloaded. You can set a low alarm too—which can be handy if you have an auto-top up feed for your water and, say, one of your nutrient bottles run out. Similarly, you can also set your Pro Controller to alert you if, say, it’s dosed fifteen times, but nothing has changed—another indicator that something is awry.
pH is easy to figure out. Select the target pH—6.0. I selected an on-time of one second and high and low alarms of 6.5 and 5.5 respectively. I’m dosing pH down as I never need to use pH up—especially when there’s potassium silicate in my nutrient mix. The Pro Controller needs to be set, so it knows the pH dosing direction is down. I diluted my pH down 1:5 with RO water. I also set the pH dosing “on time” to five seconds and the off-time for ten minutes—applying the same principle: make off times as long as you can to allow for adequate mixing.
Trickier Ingredients
How do the potassium silicate and cal-mag supplements work with the Pro Controller? Pre-dilute these solutions 1:1 or 1:2 with reverse osmosis water, in the same manner as the pH adjuster. Be sure to use reverse osmosis, not tap water, to dilute any nutrient solution or pH adjuster down. Be accurate with your measurements. I diluted both my potassium silicate and cal/mag supplements 1:1 with reverse osmosis water—so they’re at 50% normal strength compared with straight out of the bottle. You will need to double the dosage rate accordingly to compensate.
Setting Dosage Rates
Using the Bluelab Connect software, I select the pod I want to edit. (I’ve got two daisy-chained to the Pro Controller.) For each pump on each pod, choose whether it’s a nutrient pump, a pH adjuster pump, or not in use. Start with the bottle with the highest dose rate. For me, that’s the Grow A or the Grow B— 2 ml per liter. The other two bottles, the diluted potassium silicate and the CalMag supplements will be dosed at 1 ml per liter and 2 ml per liter respectively.
Switch on the reservoir circulation pump and make sure your pH and EC probes are clean and fully submerged. I like them to be close to the bottom of the tank.
When switching on the Pro Controller for the first time, manually prime the pumps so that the liquids are sucked through the tubing. Calibrate the pH meter using the calibration fluids provided. It only takes a few minutes, but it’s essential not to skip this step.
Change the mode on the Pro Controller from “Monitor” to “Control” — hit Apply — and we are auto dosing! Woohoo! I remember the feeling of joy as my Pro Controller sprang into life and started its dosing and pH cycles.
When I used this system in conjunction with flood and drain systems and an auto-top-up float valve to top up my reservoir with reverse osmosis water, I made sure my float valve was further down to minimize the risk of overfilling during the flood cycle. Also—when you figure out that it’s time to change out your reservoir, I suggest disabling the auto-top off and let your reservoir run itself down some, so you’ve got less spent nutrient solution.
The Pro Controller logs every dosing event—and you can save different nutrient regimens. It’s entirely feasible to create one for each week in the lifecycle. This means you have a permanent record of exactly what you fed your plants. This, along with environmental data, gives you a pretty thorough picture of what you did.
Don’t Get Lazy!
Keep an eye on your pH and conductivity probes. It’s easy to forget about them when you’re not manually testing. Clean the probes every week and calibrate the pH meter regularly. If you don’t, the readings will be less accurate, which invalidates the whole premise for auto-dosing in the first place. Conductivity probes can form deposits of sludge, which can increase the measured conductivity between them, giving you a false high reading.
Lift your nutrient bottles and check their weight periodically—make sure they’re not getting too low. The Pro Controller will alert you if it’s trying to dose, but the nutrient solution strength doesn’t appear to be rising—a sure sign that a bottle is empty. If some of the bottles are full and others not, then the system will dose what it can—and this can lead to an imbalance. It doesn’t hurt to give them a shake once in a while—especially those “slurry style” one part nutrients.
Many growers use air pumps connected to air-stones to increase dissolved oxygen levels. Fine, but be aware that the nutrient solution pH tends to rise more quickly. Keep an eye on your logs and the pH dosing events.
If you’re using a gloopy, viscous one-part nutrient or some exotic additive, calibrate the corresponding pump, so it’s compensated for the increased density of the liquid.
Conclusions
My only regret is not biting the bullet earlier in my growing career. All those hours I could’ve clawed back over the years! It’s time I can’t get back. Moreover, my plants have never looked healthier—and I spend a lot more time just staring at them, and inspecting for pests, and doing all sorts of other peripheral grow room tasks, that I feel as if I’ve leveled up as a grower.


3 Responses
Great info. I just ordered an automation system that looks to work the same way. I’m not sure about my nutrients though. I have been using Envy A and B but their dose chart shows a varying amount and ratio of each from week to week. For example week 1 is 5ml of A and 2.5ml of B per gallon. Week 4 is 10 and 10, and week 10 is 5 and 15. Automation looks like it is going to give me the same ratio using the same “on” time. Do I need to switch to a different nutrient that has a steady ratio?
Great information. Would love to go fully auto as well other than the initial setup costs.
Excelente muchas gracias por compartir to conocimiento